The last entry in the navel-gazing series talking about my personal productivity tools.
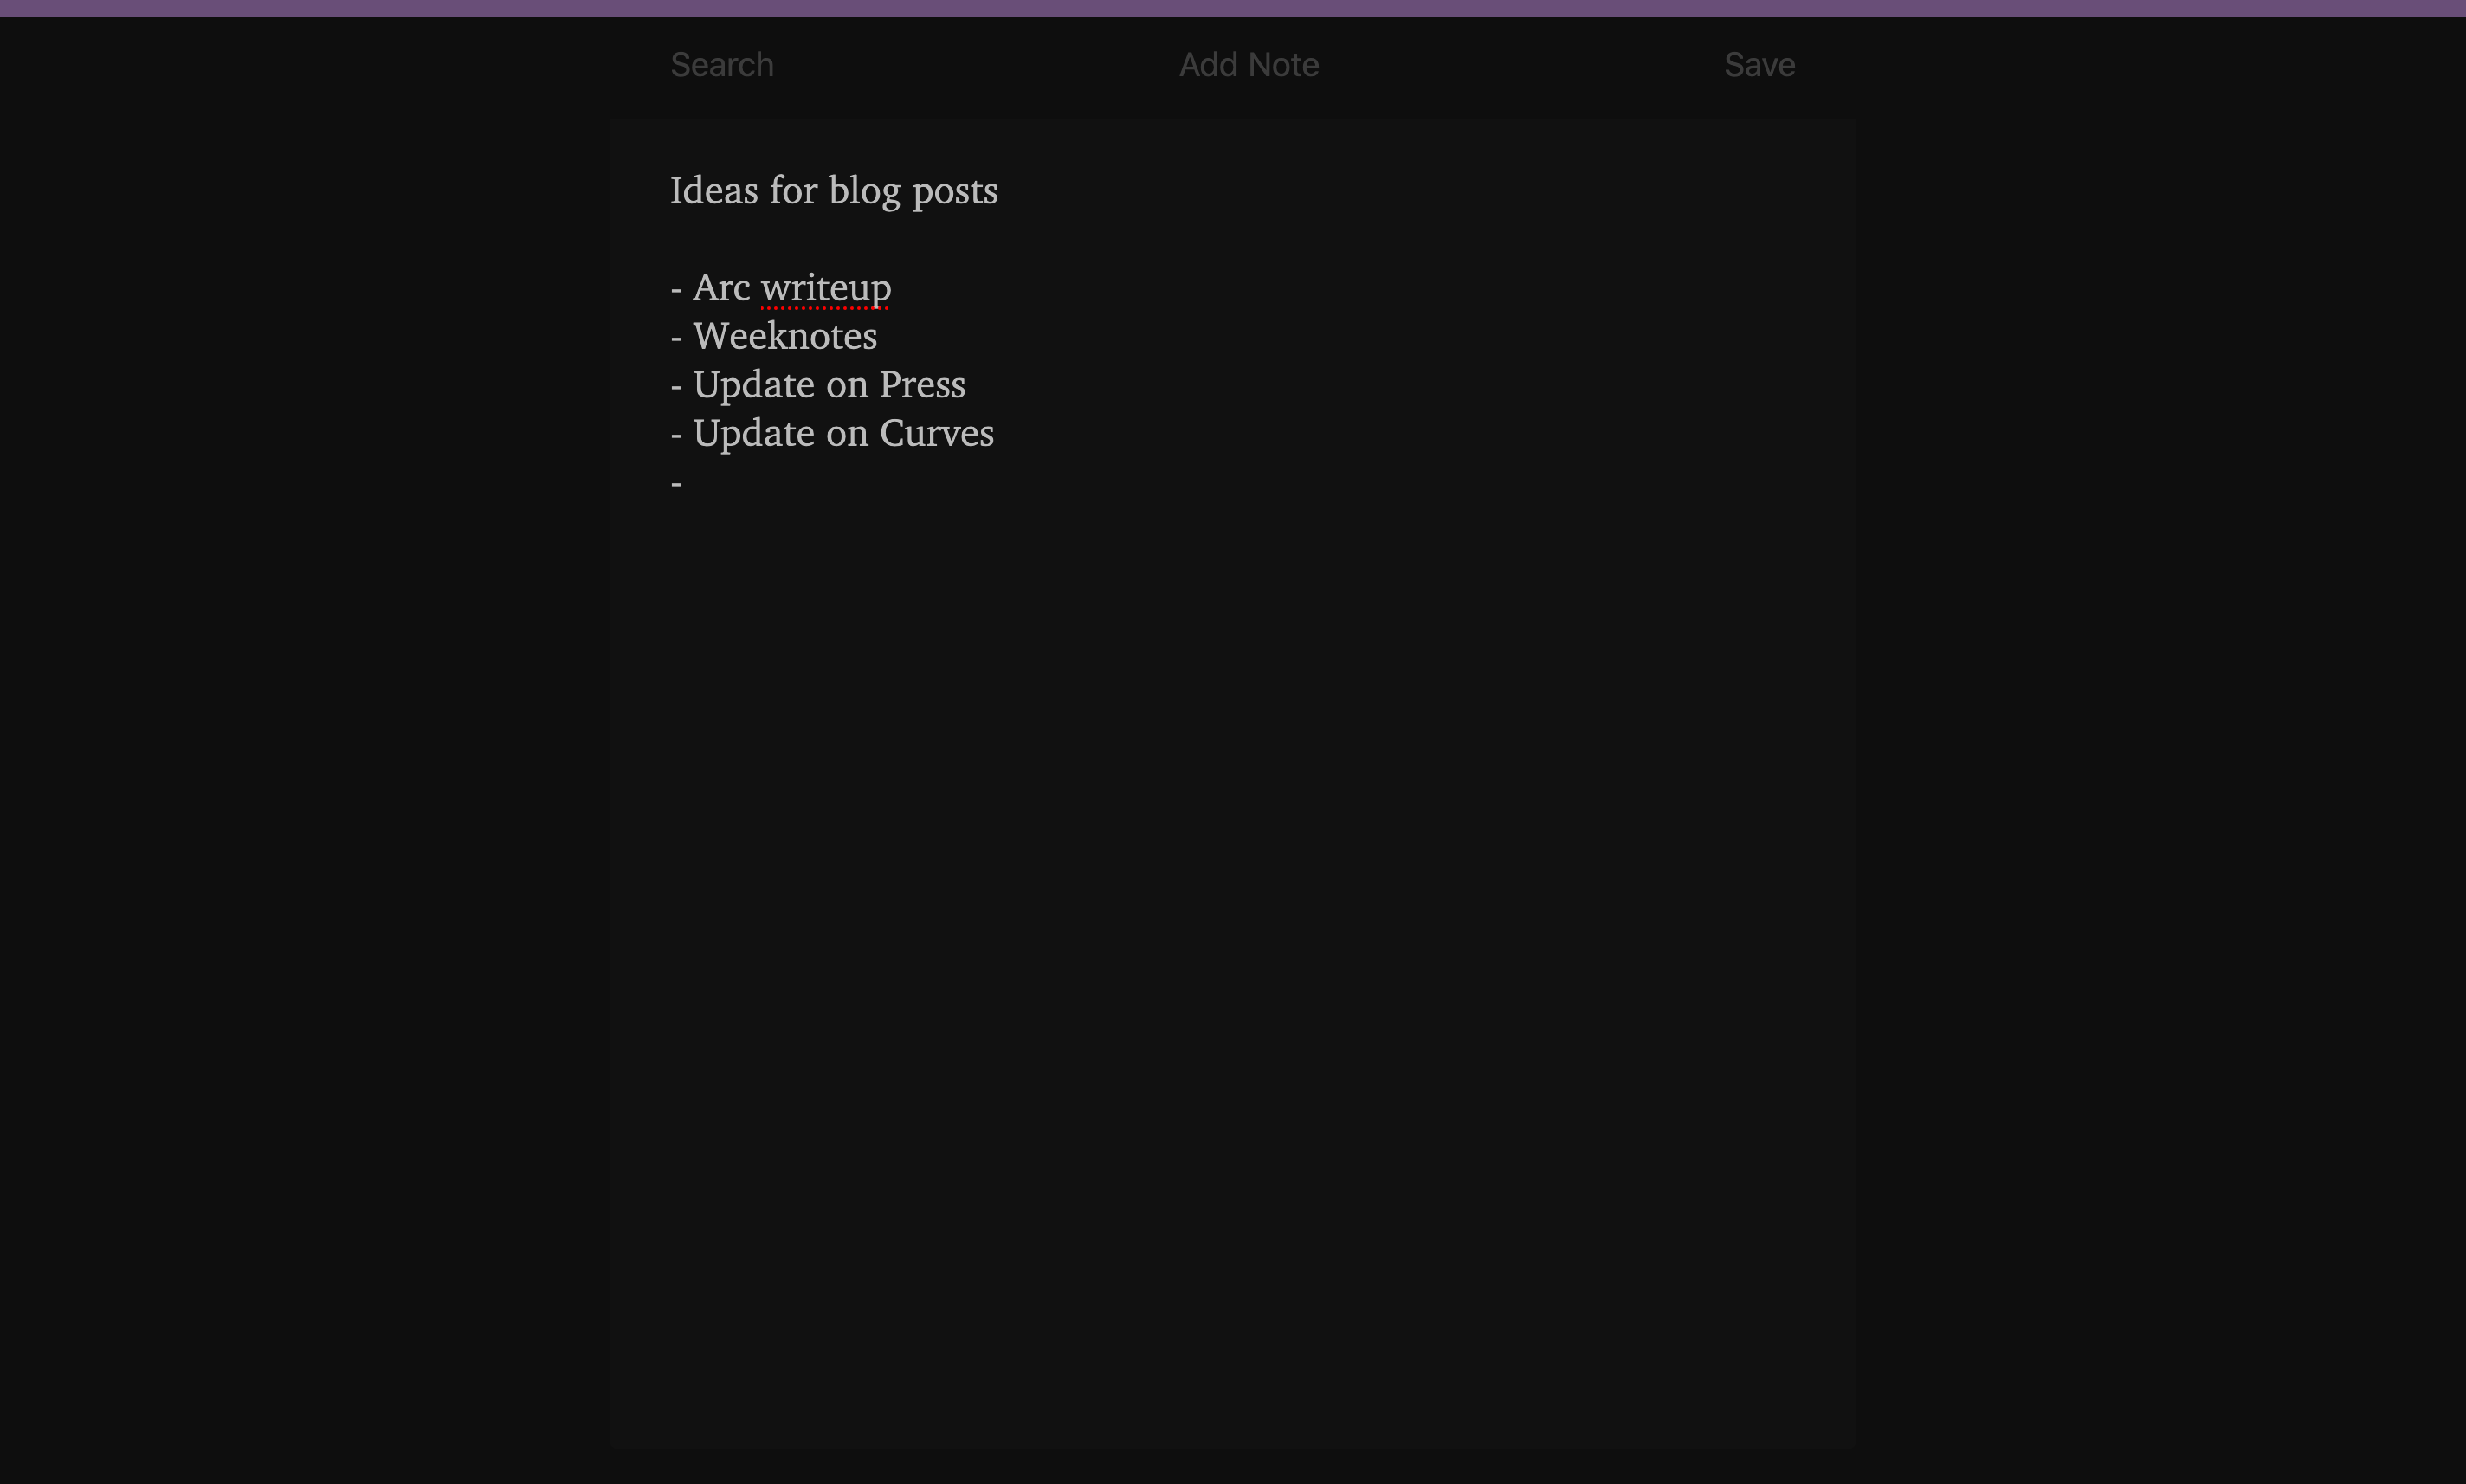
Arc is my private notes app. It’s a Python app running FastAPI. The name is short for Archive, as in an archive of notes. It’s my latest app, too — I wrote it around a month ago, as a replacement for Apple Notes (to try to get back to more of a Notational Velocity or Simplenote kind of thing). And just to be clear, this is distinct from the digital garden notes idea I talked about earlier.
Overview
Notes are just text files, stored in a directory with UUIDs for filenames. By default it opens to a blank note screen, but that’s boring, so instead you get to see what it looks like when editing a note (with the bar at the top indicating the text isn’t saved — I originally implemented autosave but soon realized that I prefer manual):
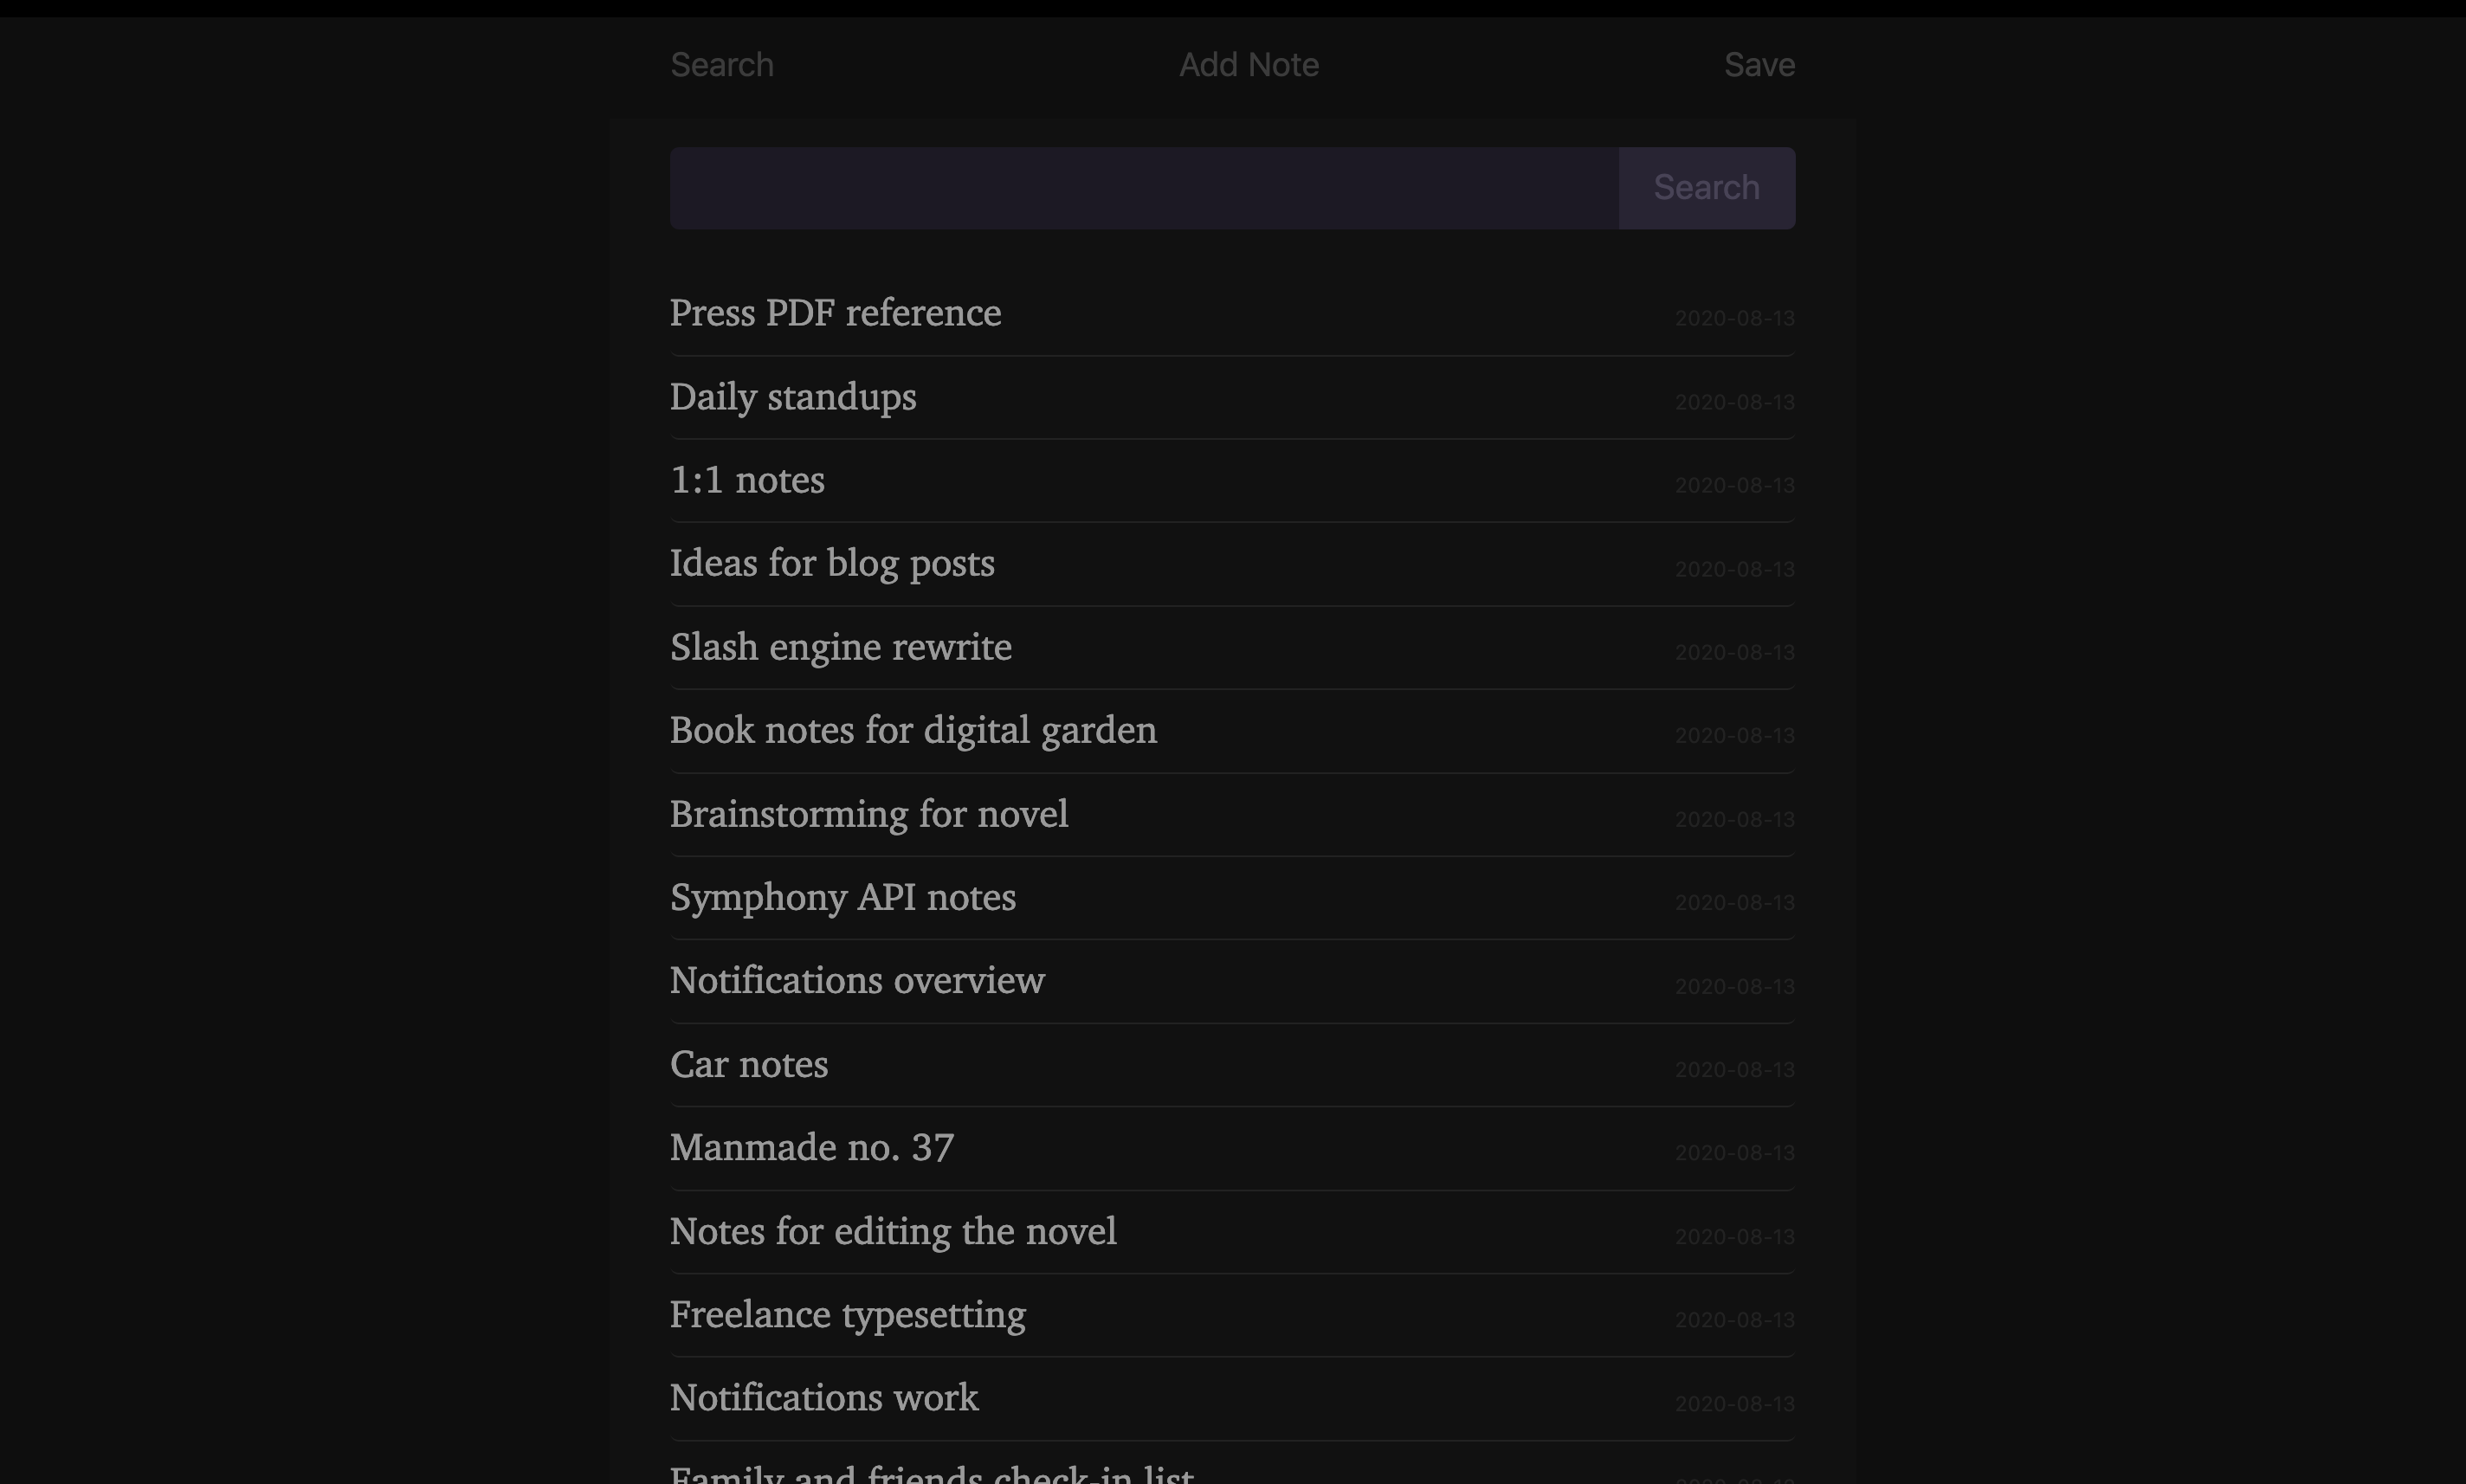
The search page lists the twenty most recently modified notes (dummy data):
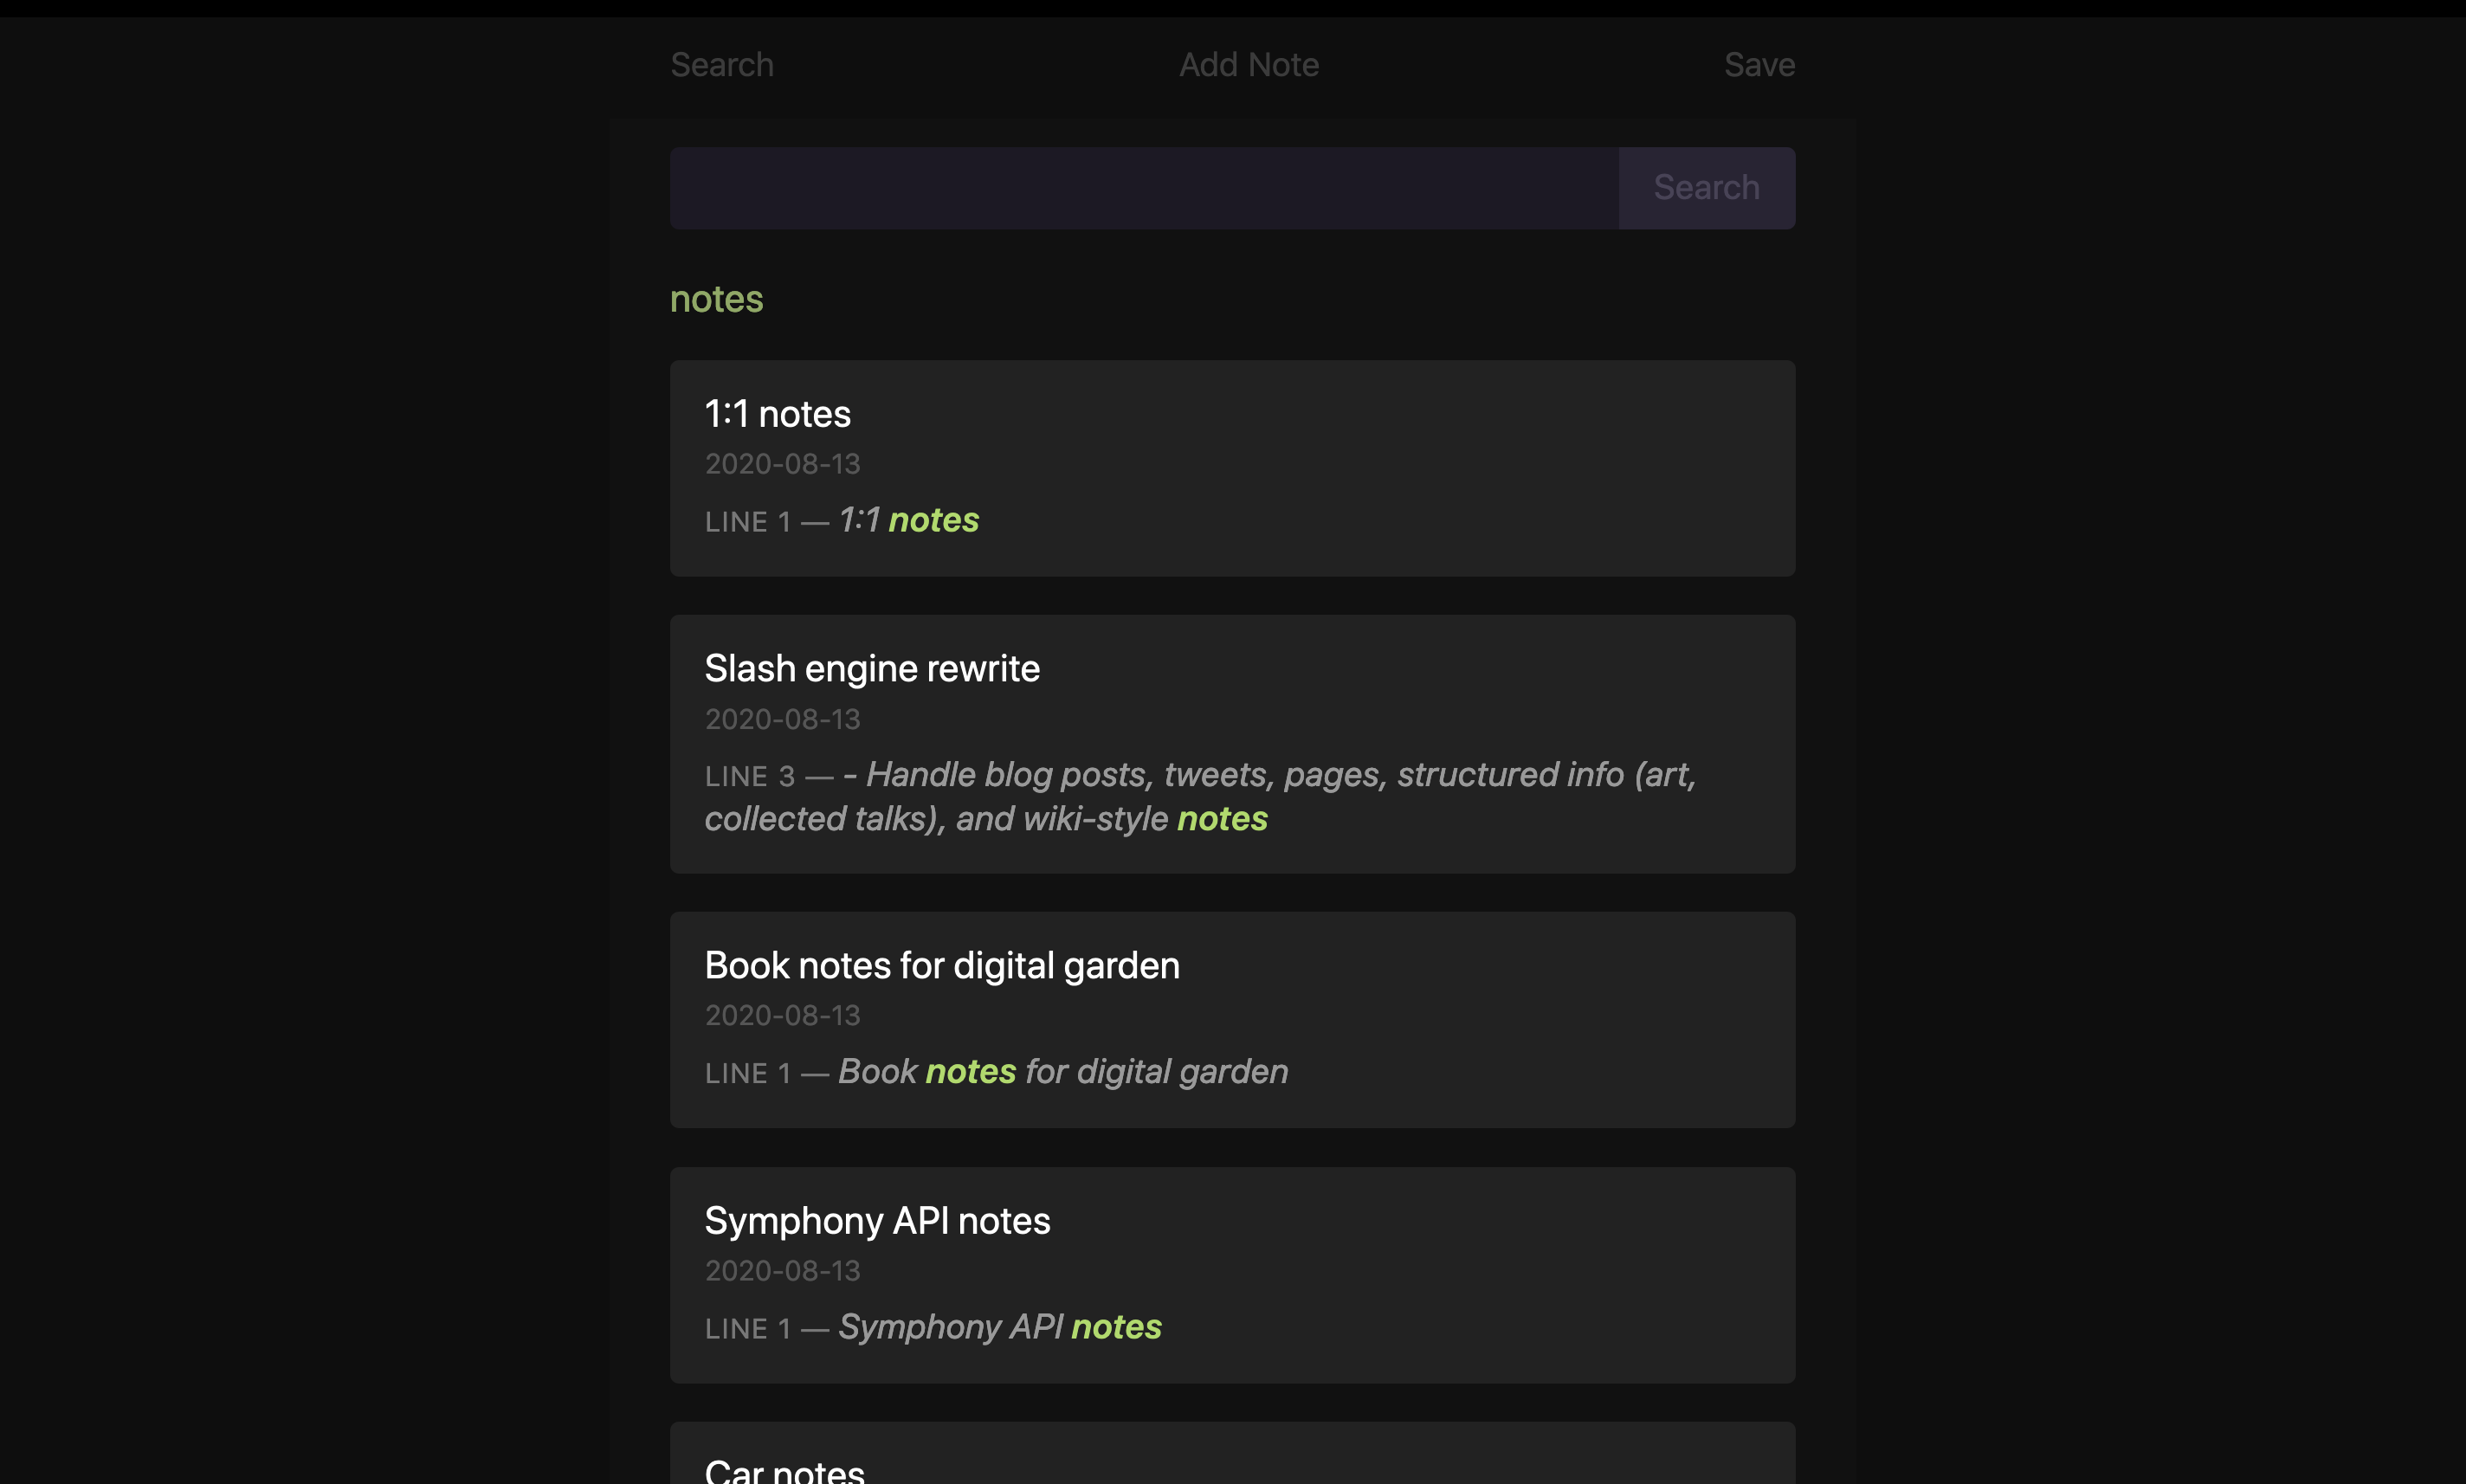
The search results page uses Ag under the hood (since all the notes are just in a flat directory for now, it was super easy and took maybe ten minutes to implement):
How I use Arc
On my laptop, I have it open in Firefox as a pinned tab. On my phone, I have it saved to my dock as a PWA.
I’ve been using Arc daily, to keep track of things that I want to be able to refer to easily later on; normal notes usage, nothing too exciting here.
The future
Arc is still pretty new, so we’ll see where continued usage takes us. I’m happy with the plain text storage and with FastAPI, though. (Thus the plans to move over to those for the other tools.) It too is a small app, with around 500 lines of code. Maybe at some point I’ll switch from Ag to ripgrep, but that’s about the only change I can think of right now.
Yet another entry in the ignominious series talking about my personal productivity tools.
Lector is a reading app for macOS. It’s an Electron app for now. The name comes from the Latin (for someone who reads), with a homophonic hat tip to Hannibal. It came about from wanting a minimalist app that would let me read PDFs and scanned books in dark mode and keep track of my spot across multiple books.
Overview
A Lector book is just a directory full of images. (PDFs have to be split up into image files first, so I have a small script to do that.) When the app starts up, it looks at the book list directory to see what books are available. It also has a JSON file to track where I’m at on each book (which page and which part of the page), what size the window is, which book I last had open, etc.
The app itself looks like this, on an empty desktop to show how I usually use it:
No title bar, since I find that distracting. And the page images are scaled by default to fit the window width.
Hitting g / brings up a brief panel showing the books that are in the system, with alphabetized keys to get to them (so g a to go to the first, g b for the second, etc.). When I’m done reading a book, I delete its directory, so these mappings change fairly regularly.
j and f and double-clicking all go to the next page; k and d both go back to the previous page. J and K move up and down the page (in larger jumps), and the mouse can also be used to scroll. (I find that I mostly use the mouse for scrolling and f/d for page navigation, but every once in a while I’ll use the other keys.)
As you can see in the screenshot, it defaults to dark mode, with slightly lowered contrast for easier reading. i inverts the colors and s toggles the higher contrast view.
How I use Lector
I use it when I want to read a book I’ve scanned (usually with Scanbook). I haven’t used it as often lately, but I fully expect that to change soon. (It’s been very handy for reading textbooks.)
I’ve found that I prefer the window size shown in the screenshot, wide (so that the text is large enough) with just enough vertical room for a paragraph or so (since reading in smaller chunks is easier).
The future
I’d like to move off Electron at some point, probably to a native Swift app. Having it support PDFs directly (or splitting them up itself) would be nice, and having a way within the app to remove books would also be good.
Finally, I’d love to add EPUB support at some point. (I haven’t yet found a desktop EPUB reader I like. Marvin’s great on iOS, though.)
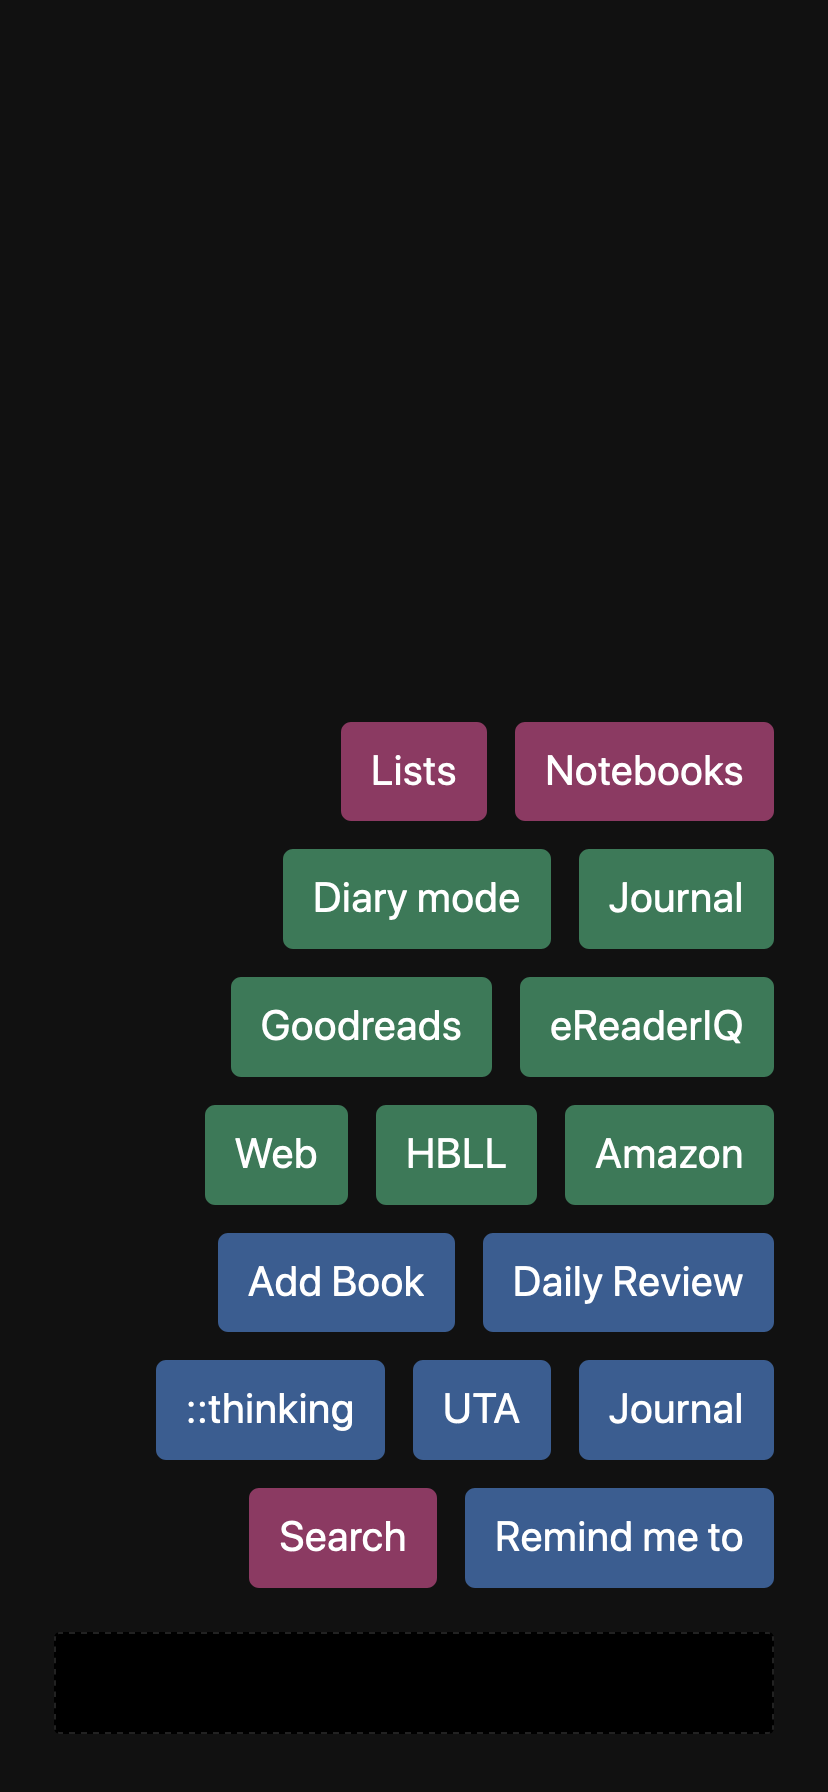
Saturn is my launcher app for my phone. It’s a small Go web app. The name comes from the Saturn V rocket launcher, and I wrote it as a replacement for Launch Center Pro (when it switched to a subscription model, because apparently I am allergic to those).
Overview
This is what it looks like:
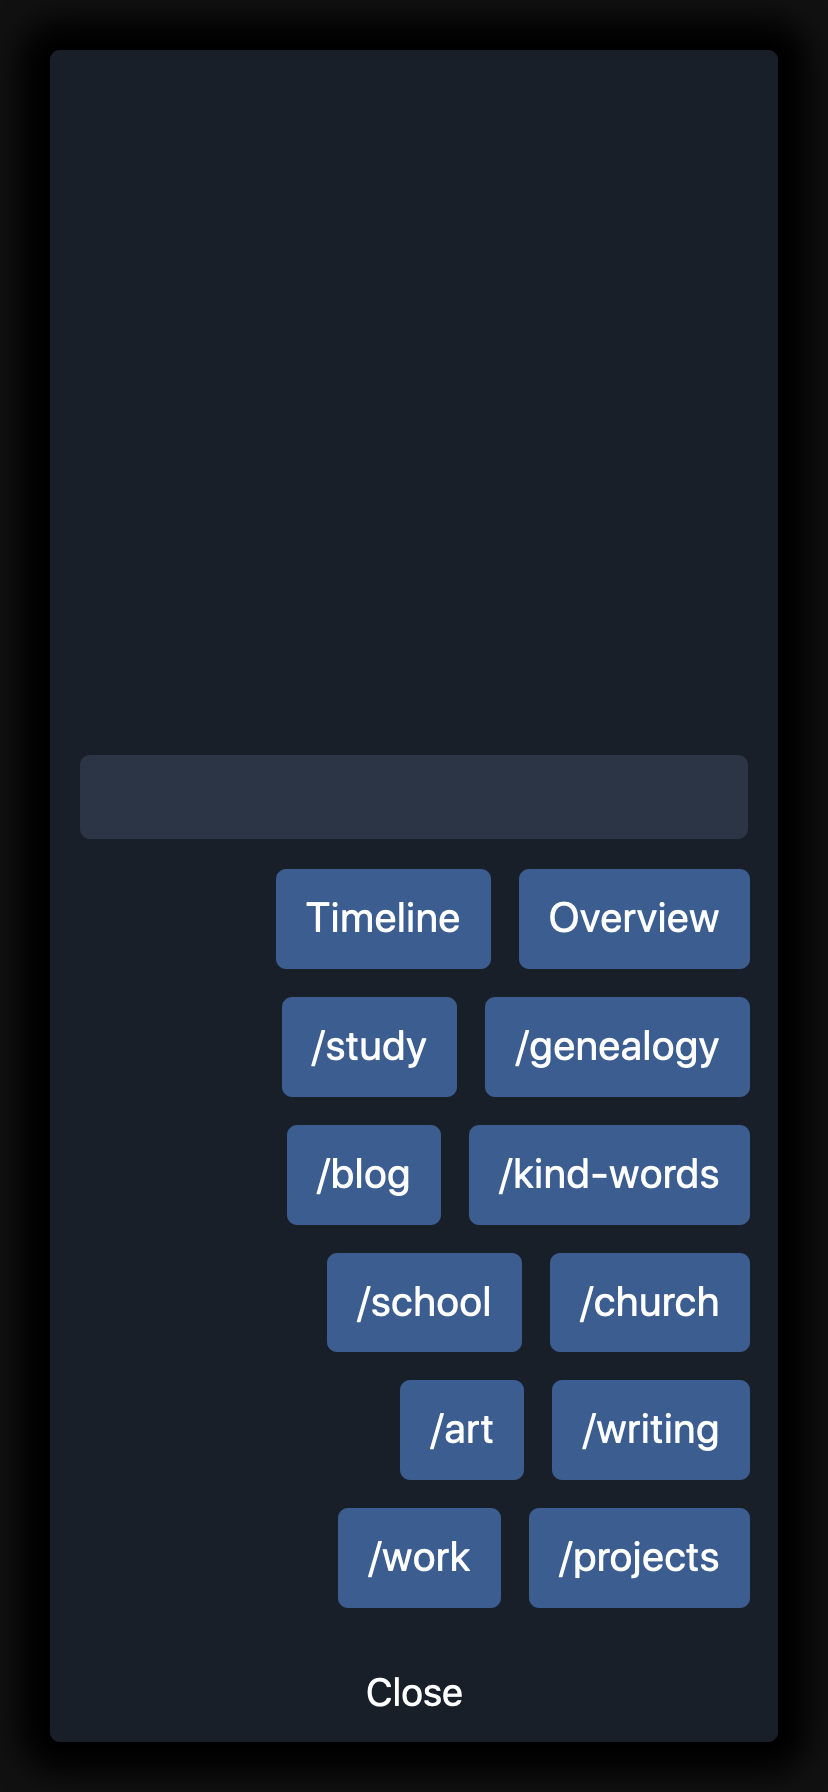
The blue buttons are direct links to pages. There’s a very hard to see dark textbox at the bottom, and if I type something in there, the green buttons take that and execute a search somewhere else. Finally, the pink buttons open secondary panels, like this Notebooks panel:
On this panel, the lighter rectangle above the buttons is a search box that allows filtering through Vinci notebooks.
How I use Saturn
On my phone, I have it saved to my dock. It’s not set to be a PWA, because then the links would open in the in-app Safari; I prefer having them open in normal Safari.
I use Saturn pretty much every day. I mainly use it to set reminders, search Amazon, Goodreads, and eReaderIQ, and get to my journal and my daily review list.
The future
I’m largely happy with it as-is. Maybe some more refactoring of the buttons (the Search button is largely obsolete now that I’ve moved all those buttons to the main screen, for example), and it could use a little design love to make things more consistent (search boxes, for example), but that’s it.
Still another entry in the will-it-ever-end series talking about my personal productivity tools.
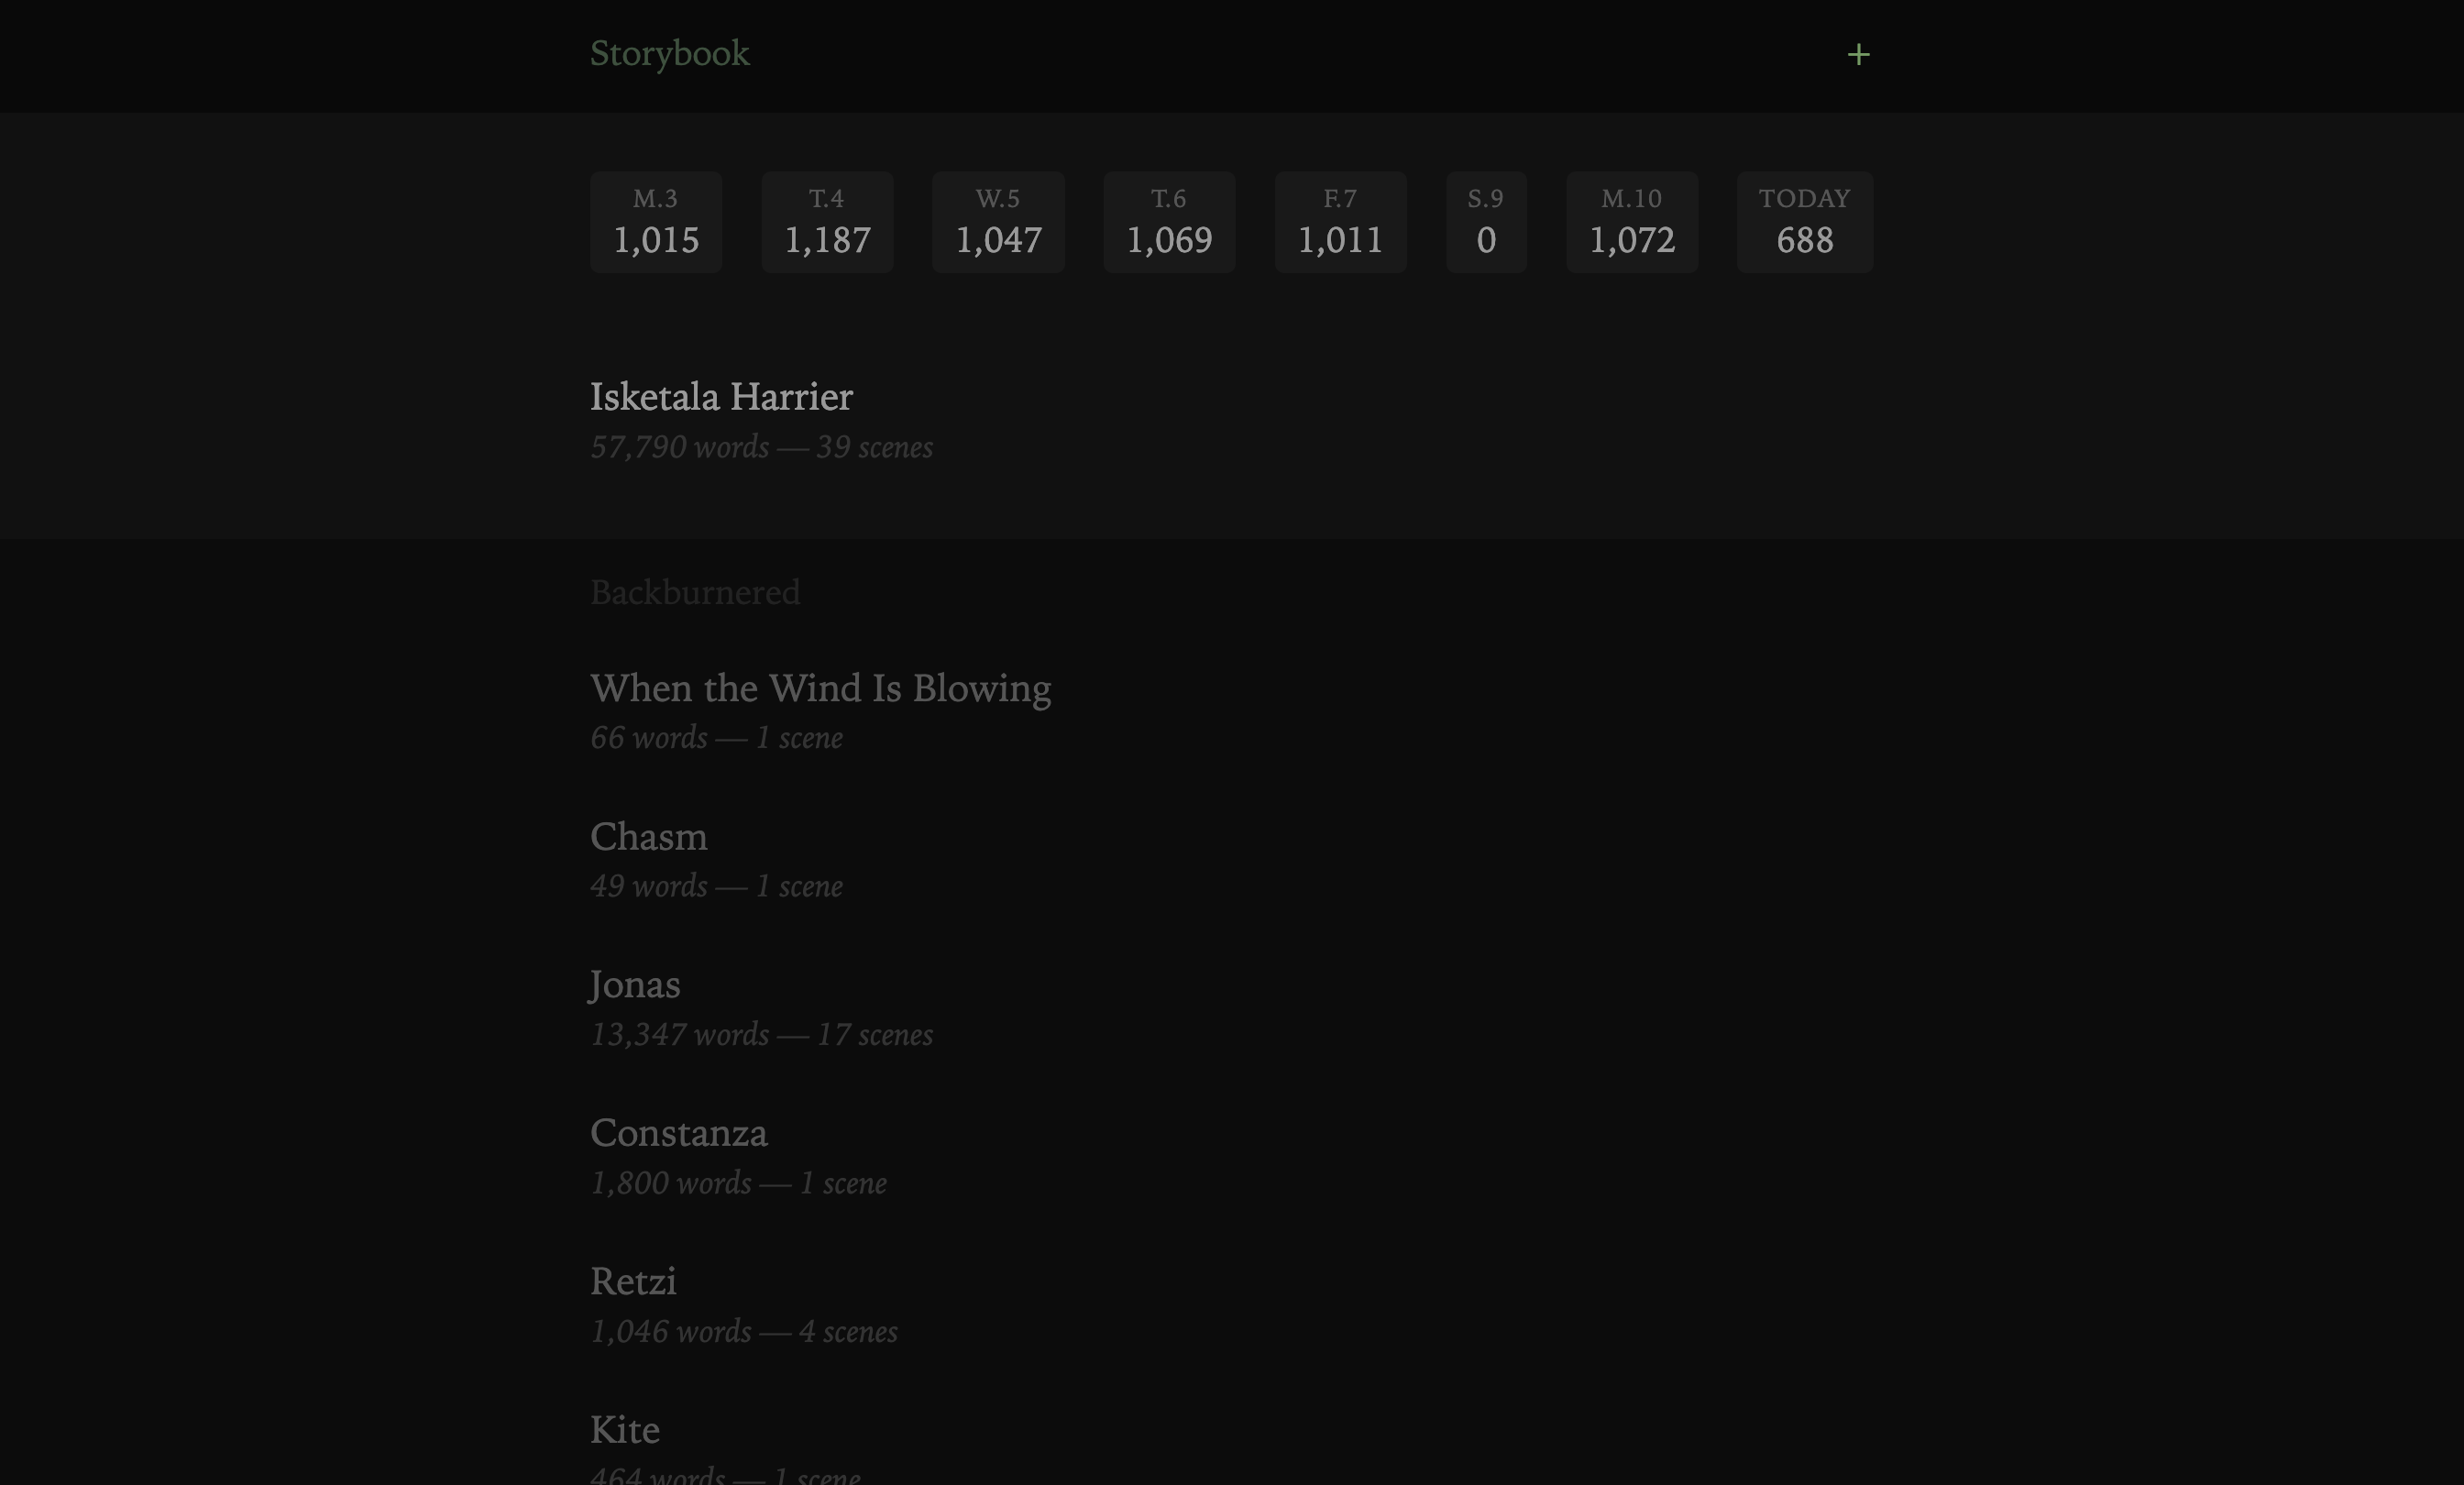
Storybook is my fiction writing app. It’s a Python app running Django. The name comes from, uh, books with stories in them.
Overview
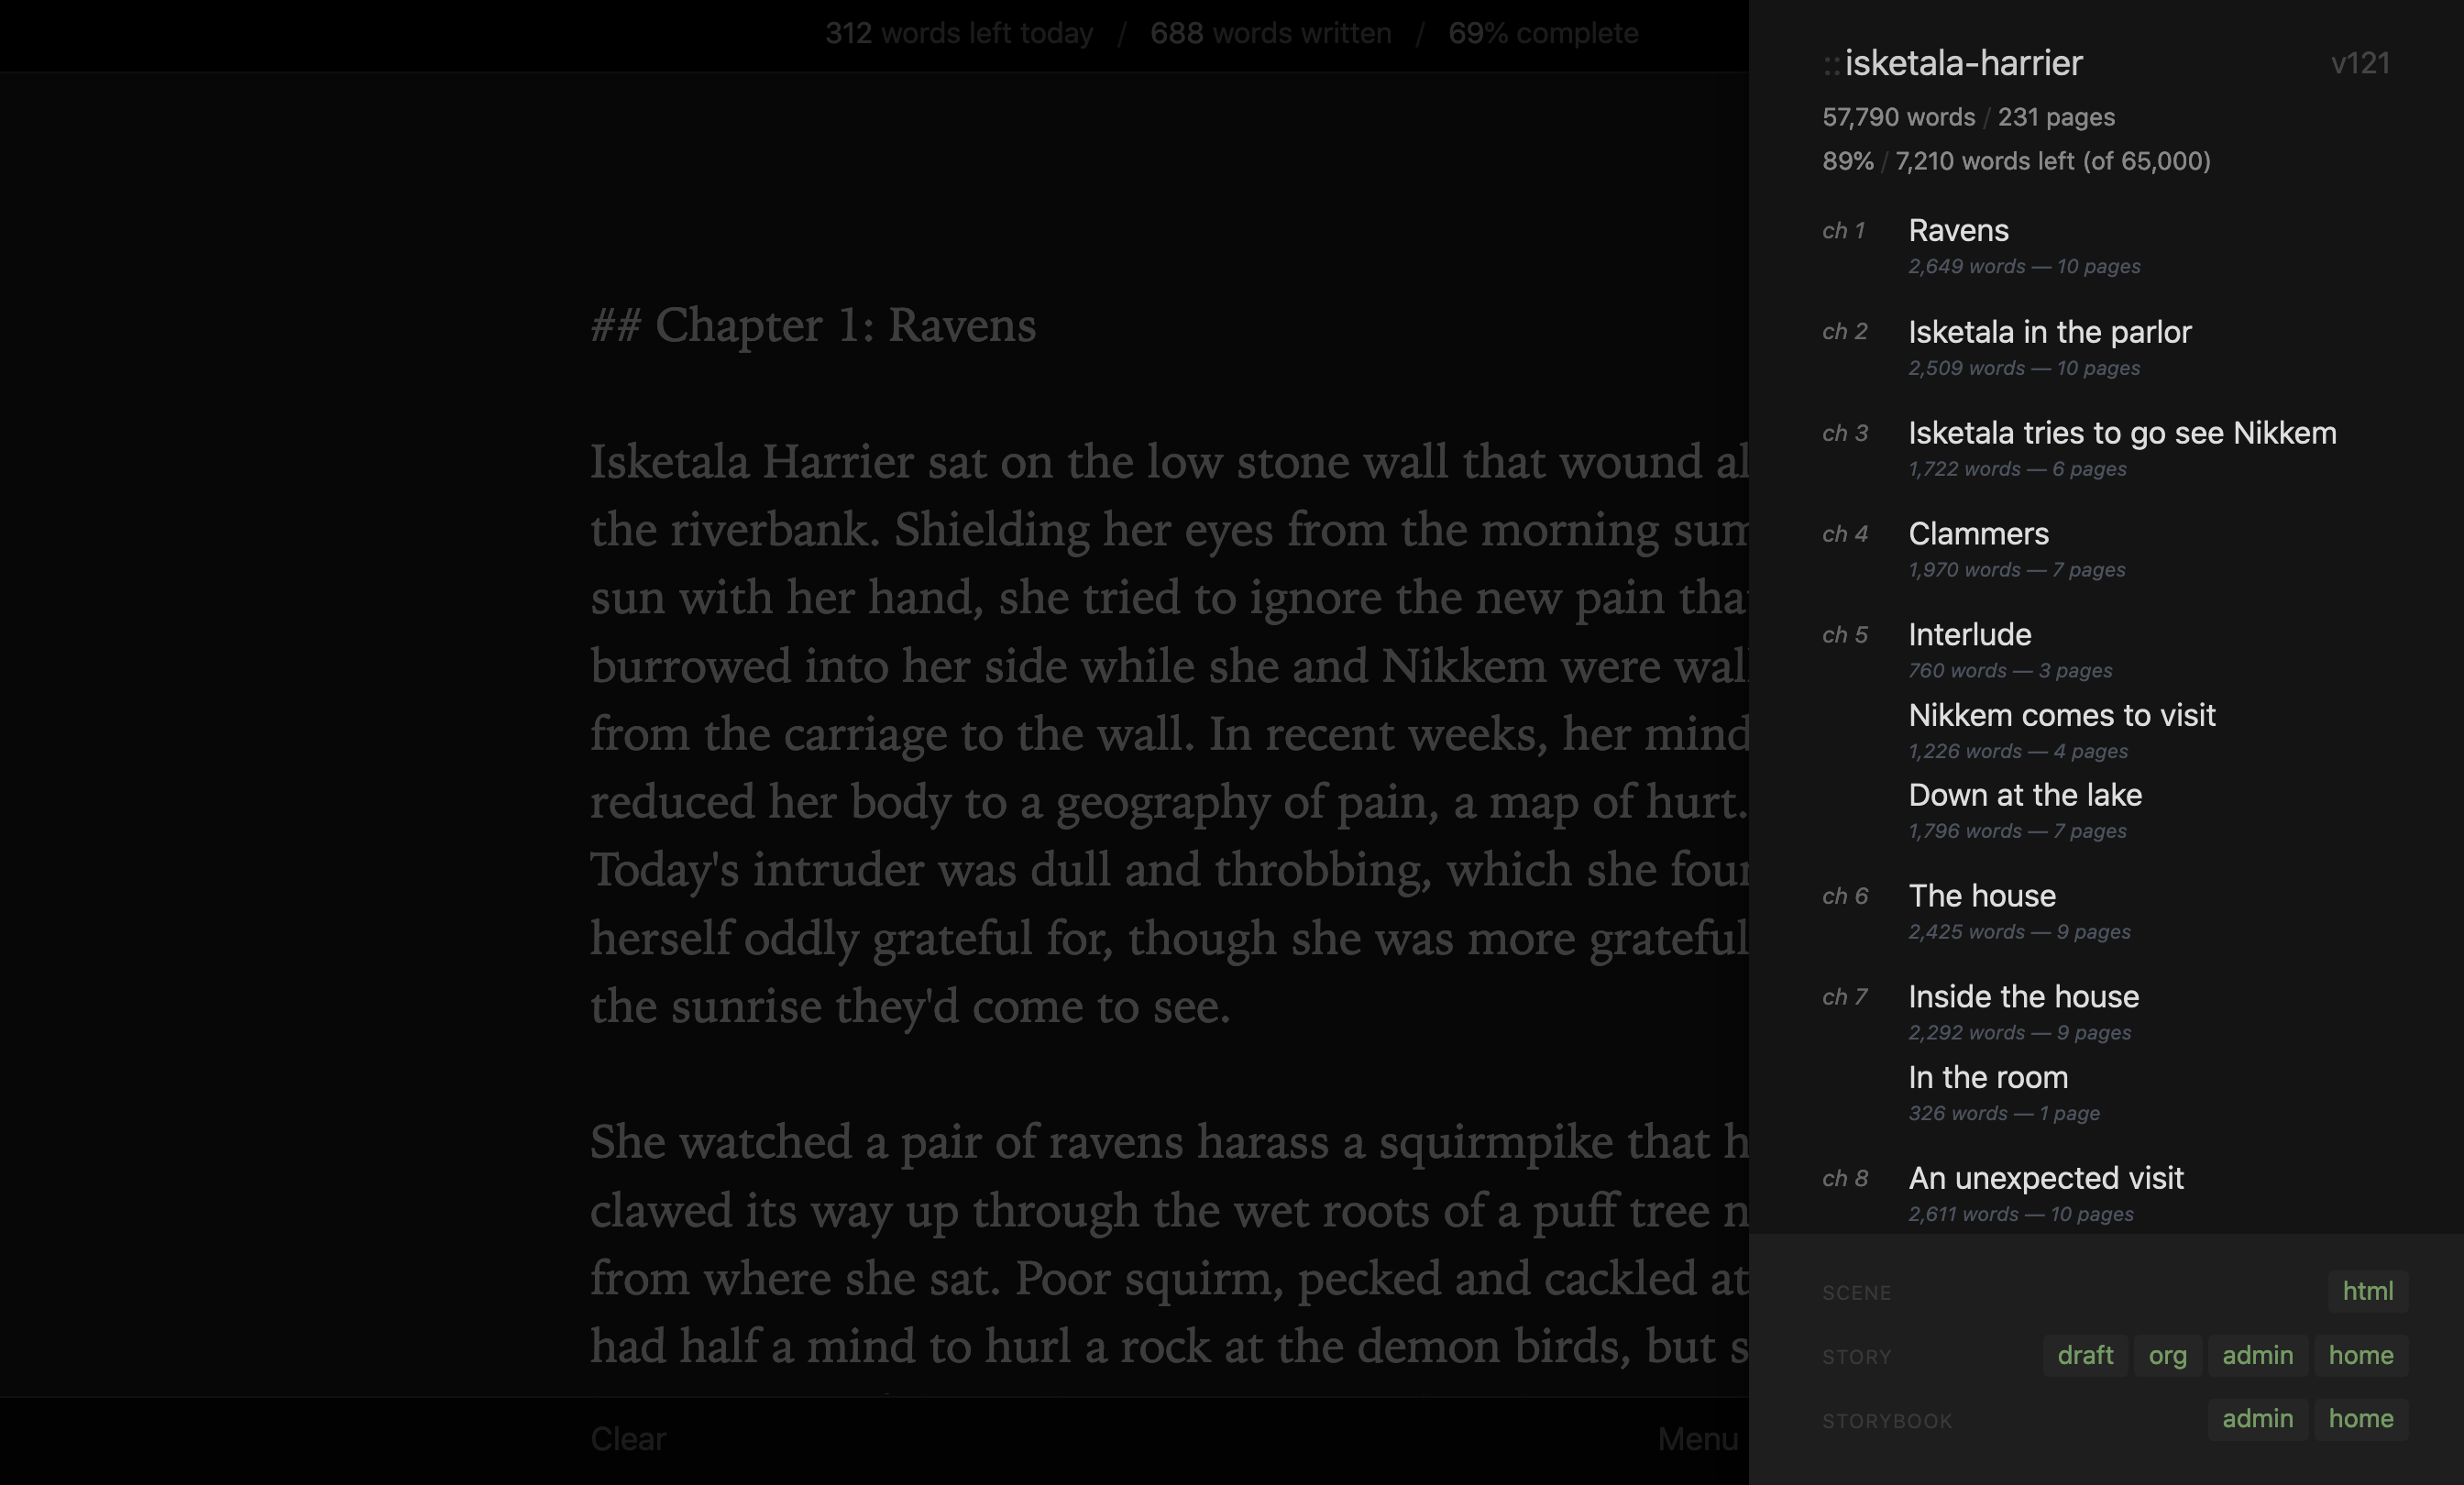
First, the dashboard, which lists weekly writing stats and active stories at top and backburnered stories at bottom:
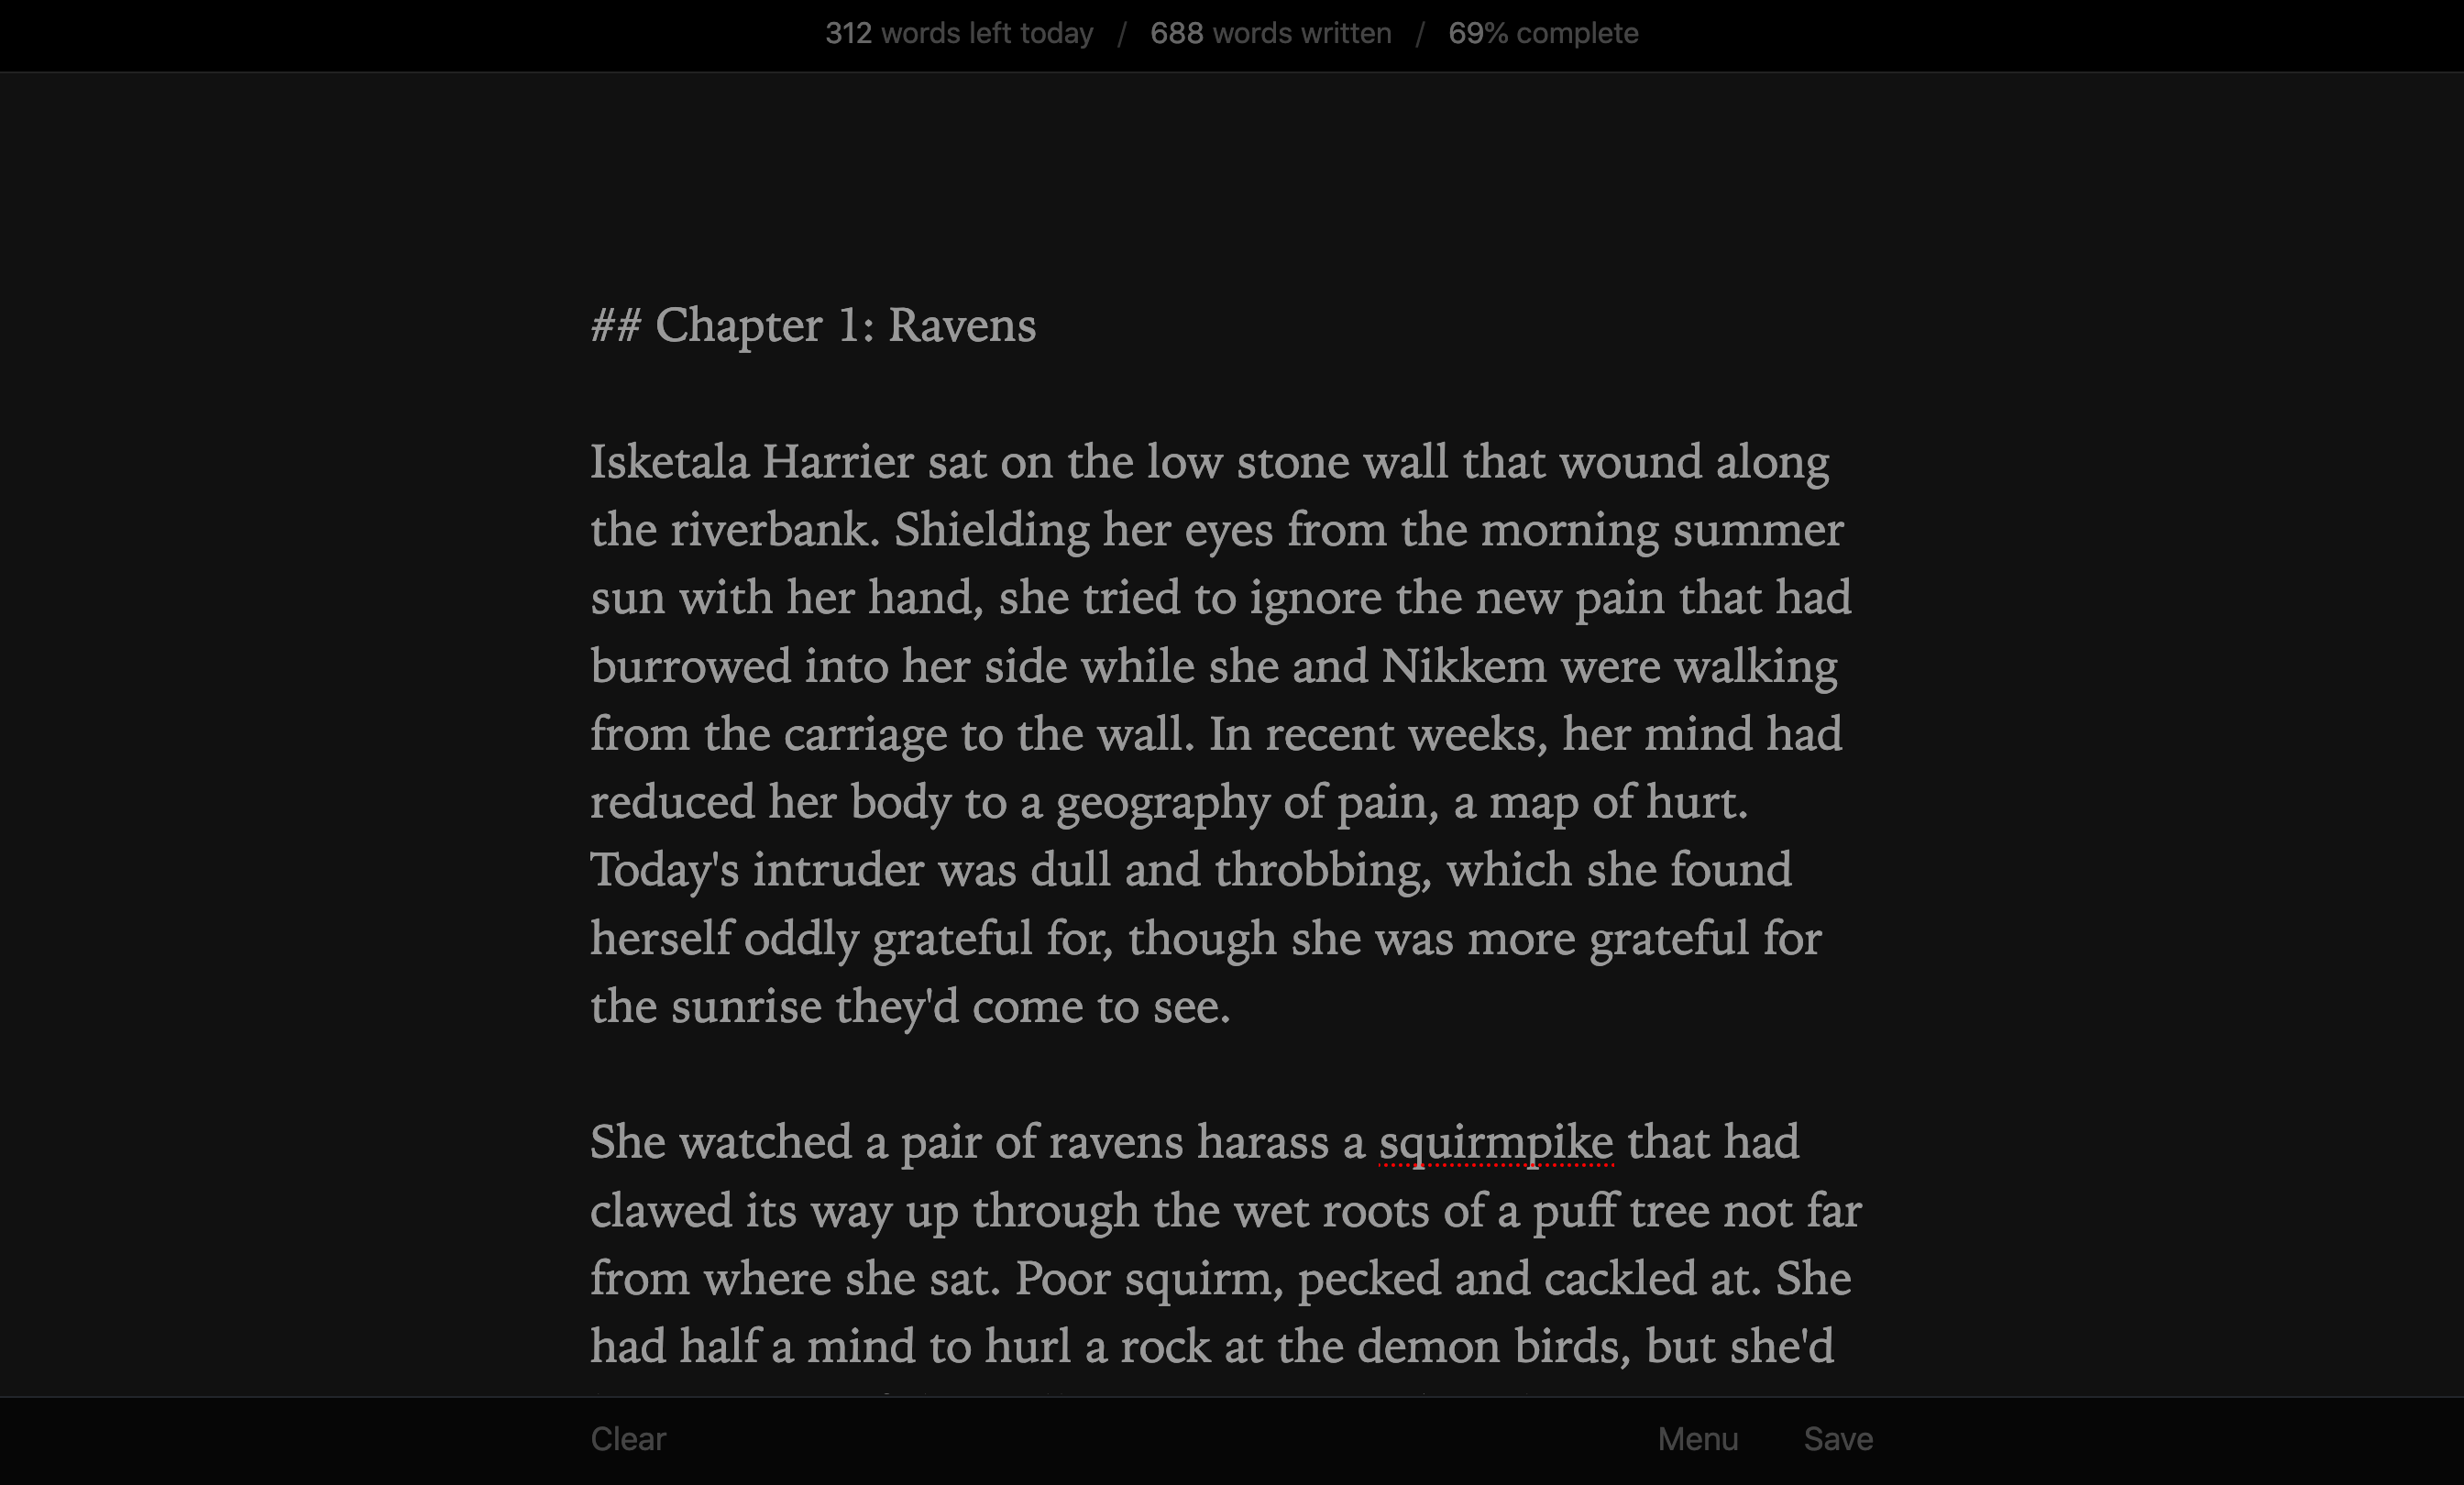
The writing view has a stats bar at top (showing how close I am to meeting my daily 1,000-word goal) and then the textbox for the actual writing:
The menu has some overall story stats and an outline (with somewhat vague and hopefully unspoilery scene titles), and some admin links:
Syntax
As you can see from the screenshots, it expects Markdown. I’ve put in a convention hack where h2 tags (##) delineate scenes. Also, scene titles that begin with “Chapter X” create chapter divisions. (Clarification: a story has a flat list of scenes. The chapter divisions are display-only.)
How I use Storybook
On my laptop, I have it open in Firefox as a pinned tab. On my phone, I have it saved to my homescreen as a PWA.
I mostly avoid using Storybook (cough) but somehow still manage to put in a thousand words a day, one word after another.
There’s a payload syntax so I can send writing from Gate or Quill to Storybook, but I never use it.
The future
Same old story: I’m planning to move it to FastAPI and start using plain text files for storage instead of a database.
At some point I want to refactor the outline UI and add search functionality.
Yet another entry in the forever-long series talking about my personal productivity tools.
Bookshelf is my reading tracking app. It’s a Python app running Django. The name comes from, uh, the thing that holds books.
Overview
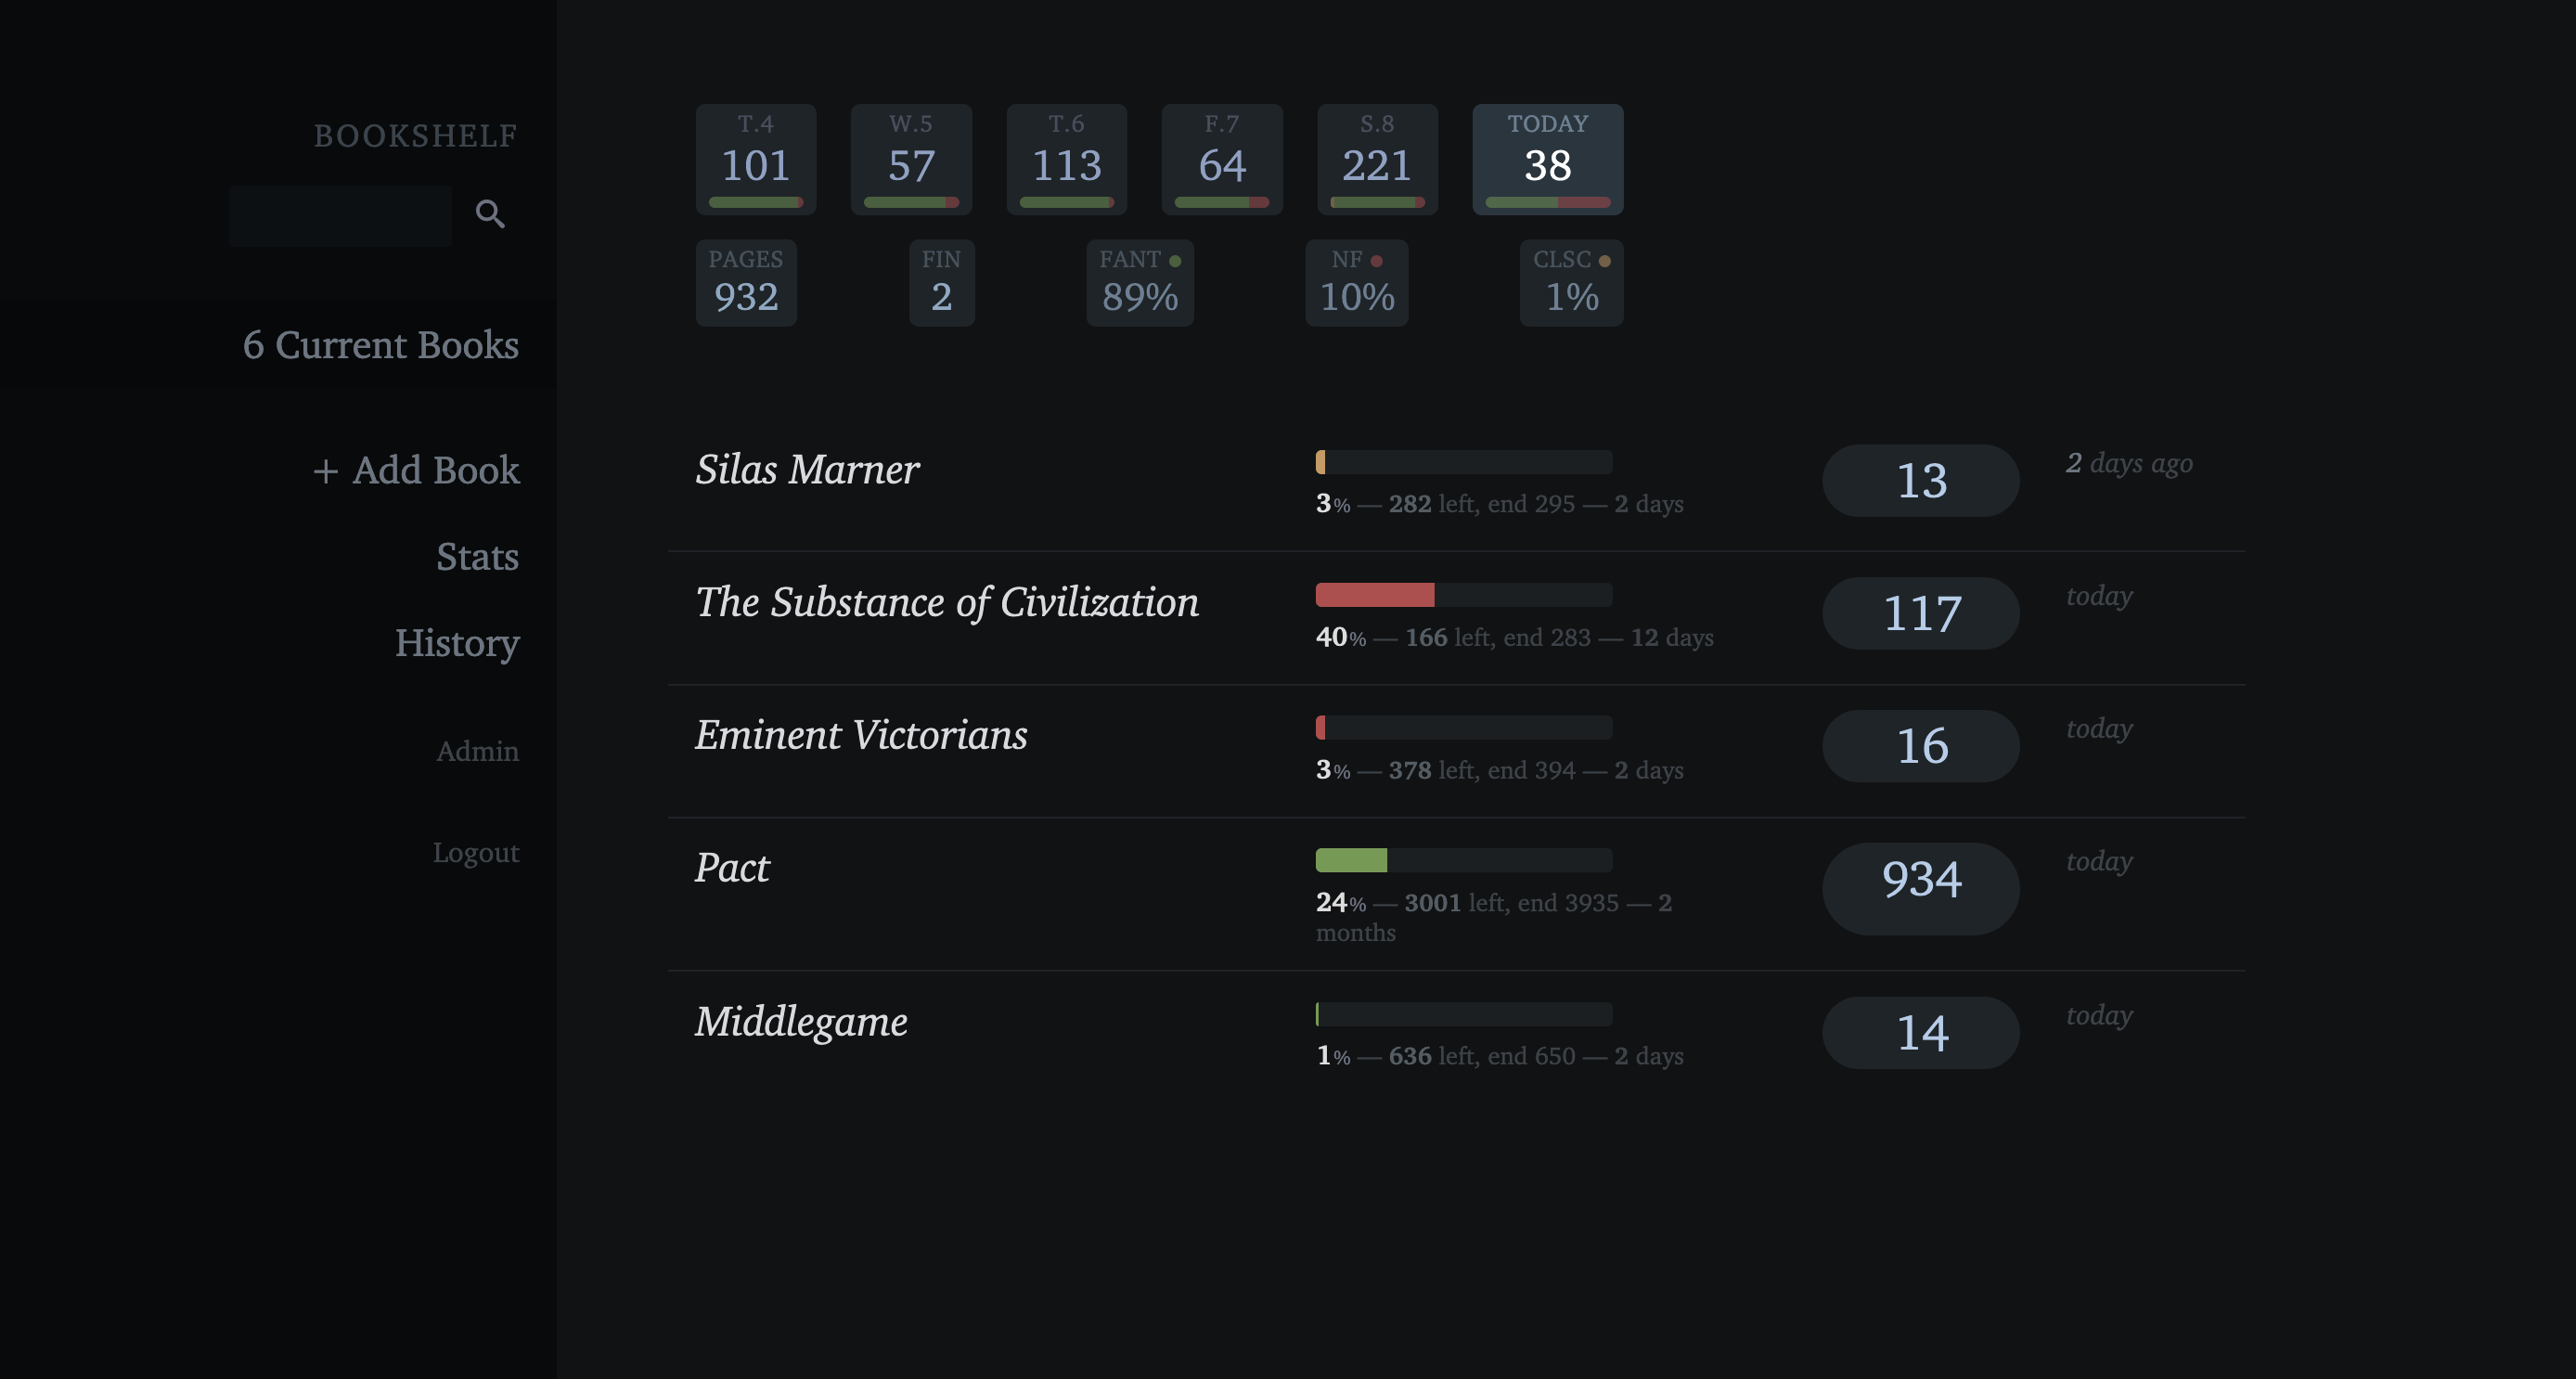
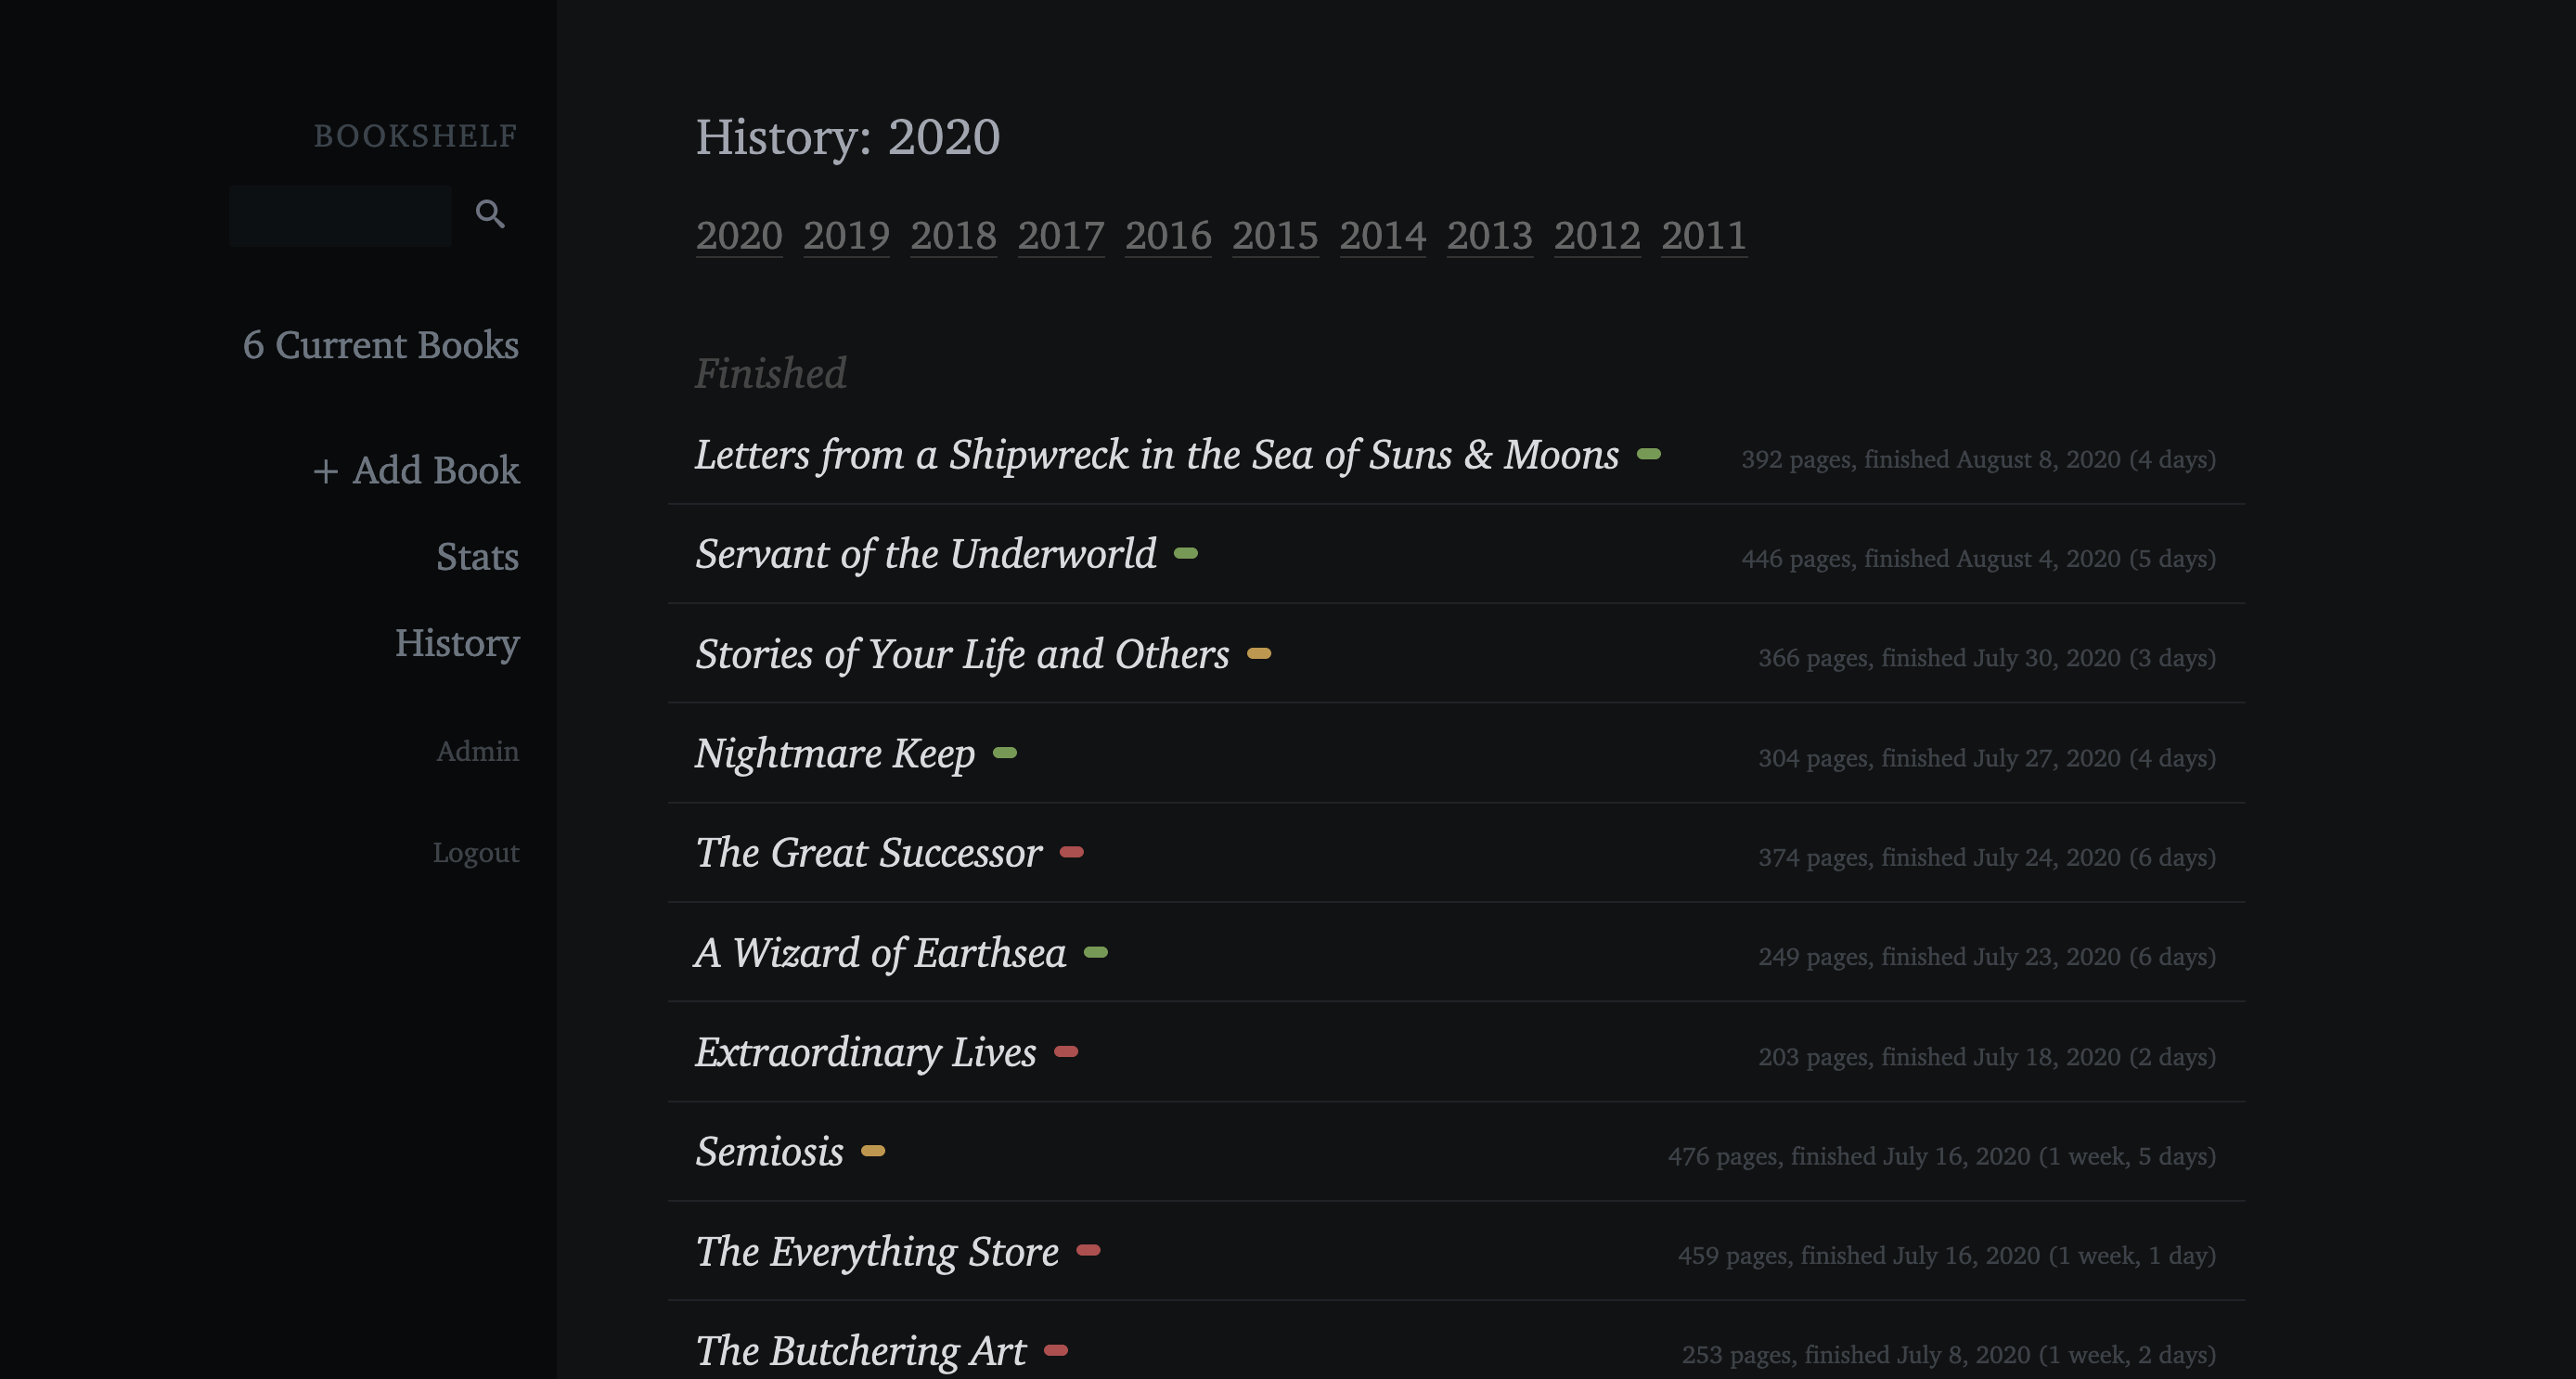
Behold the books:
At the top there’s the stats panel, which shows how much I read the last six days with color coding for the genre tags (and yes, Wednesday and Friday I didn’t meet my 100-pages-per-day goal), my page total so far this month (932), how many books I’ve finished so far this month (2), and how much of my reading this month has come from each tag (I usually try to read around 50% nonfiction, but I usually fail).
And then there’s the book list itself. Title, progress bar with some extra data (including how long since I started the book), current page number (clicking this opens a panel where I can record the page I’m on along with a comment), and how long it’s been since my last entry.
Each book has a staleness limit (default is five days), where if I haven’t read the book at all in that period of time, it changes the color of the title to a glaring, awful red, and that’s sufficient motivation for me to get back to that book. (To be honest, lately I haven’t seen it come up much since I’ve been reading only a few books at a time, but in those crazy days when I was reading twenty to thirty books at a time, I saw it a lot.)
Also: the sixth book (in case you were wondering) is A Disciple’s Life, which is only visible on Sundays (I reserve it for Sunday reading).
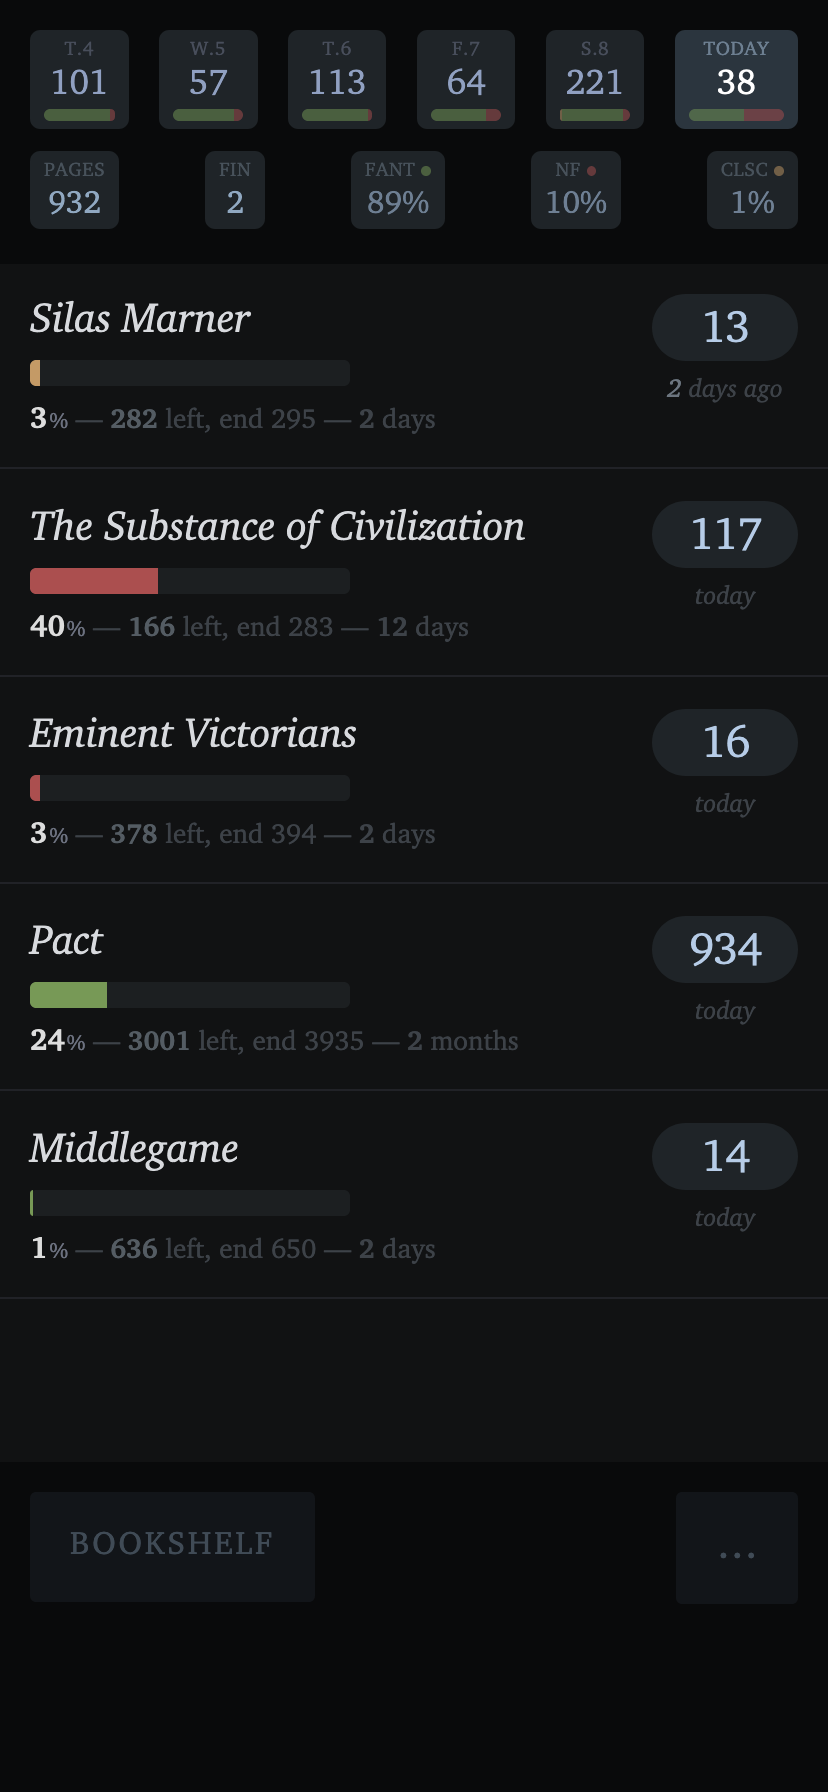
And the mobile view, for the heck of it, and since it’s the one I use almost all of the time:
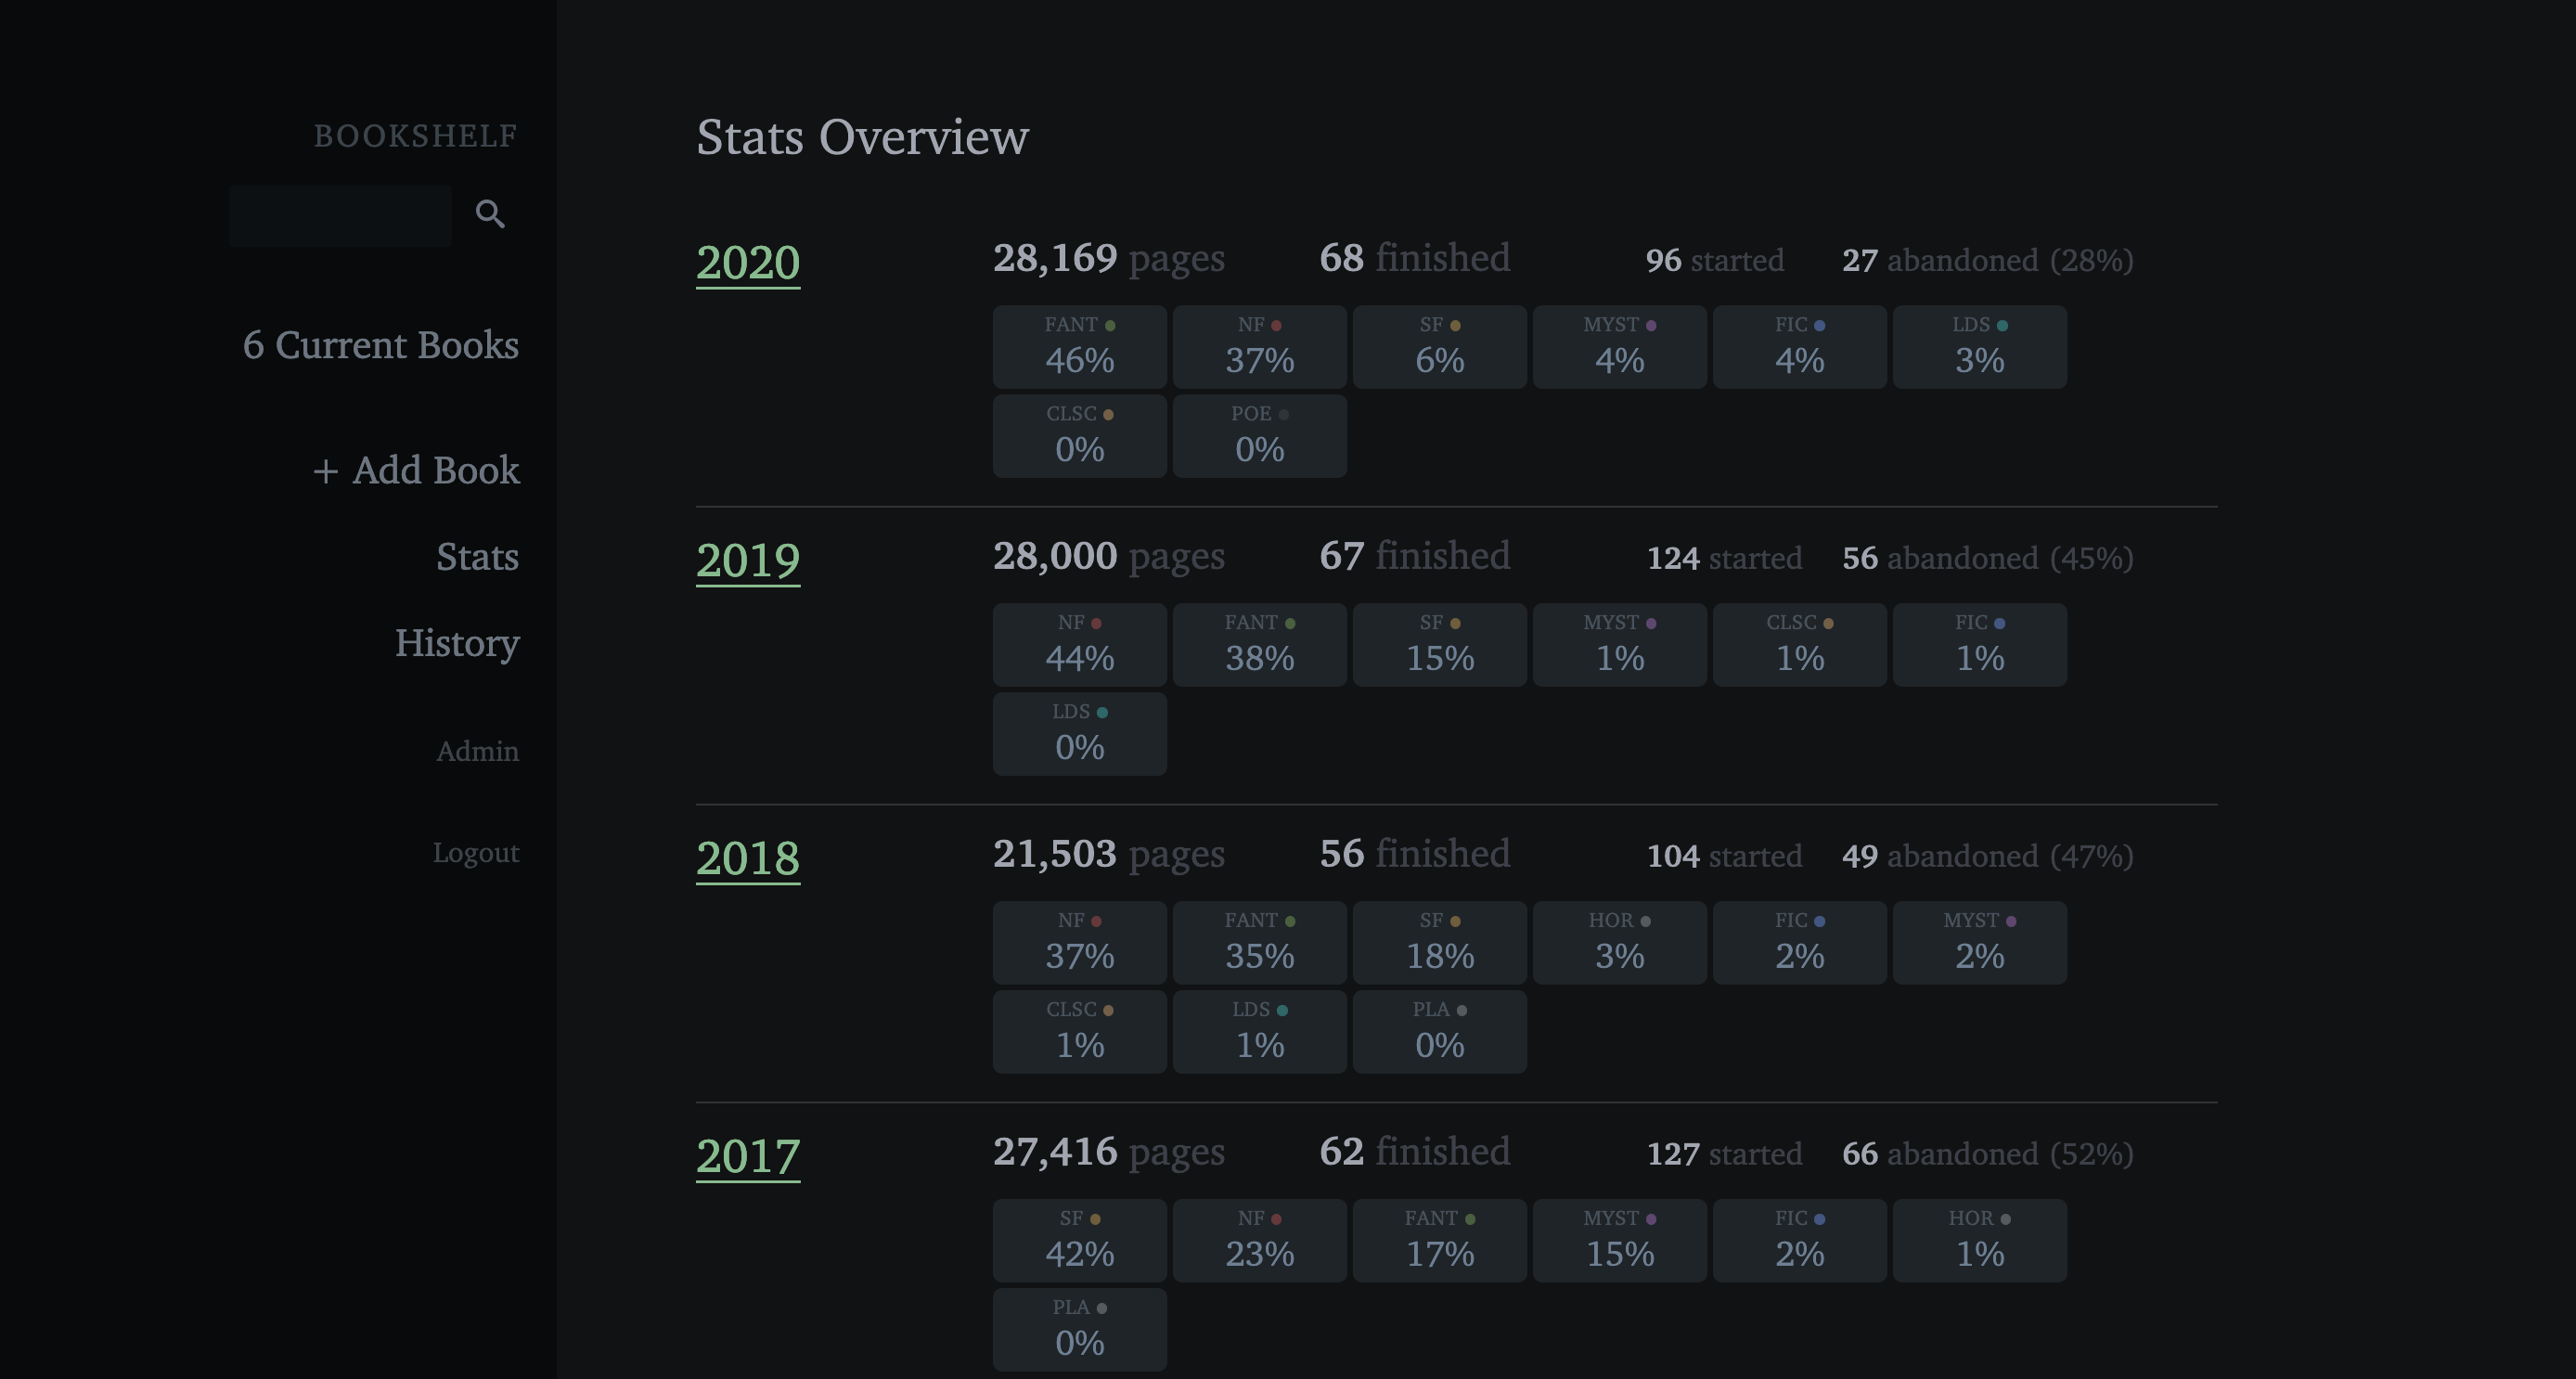
There’s also a stats page, since the statistics are surprisingly helpful in motivating me to make time for reading:
(Yes, as of a couple days ago I’ve read more this year so far than all of last year in total. This makes me inordinately proud even though it really doesn’t matter.)
And, lastly, the hopefully self-evident history page:
How I use Bookshelf
On my phone, I have it saved to my homescreen as a PWA, and that’s primarily where I use it, since I mainly read on my phone these days. On my laptop, I have it open in Firefox as a pinned tab.
I use Bookshelf every day to track my reading, both for individual books and for my daily/monthly reading goals. It’s handy, too, as a bookmark that toddlers can’t pull out.
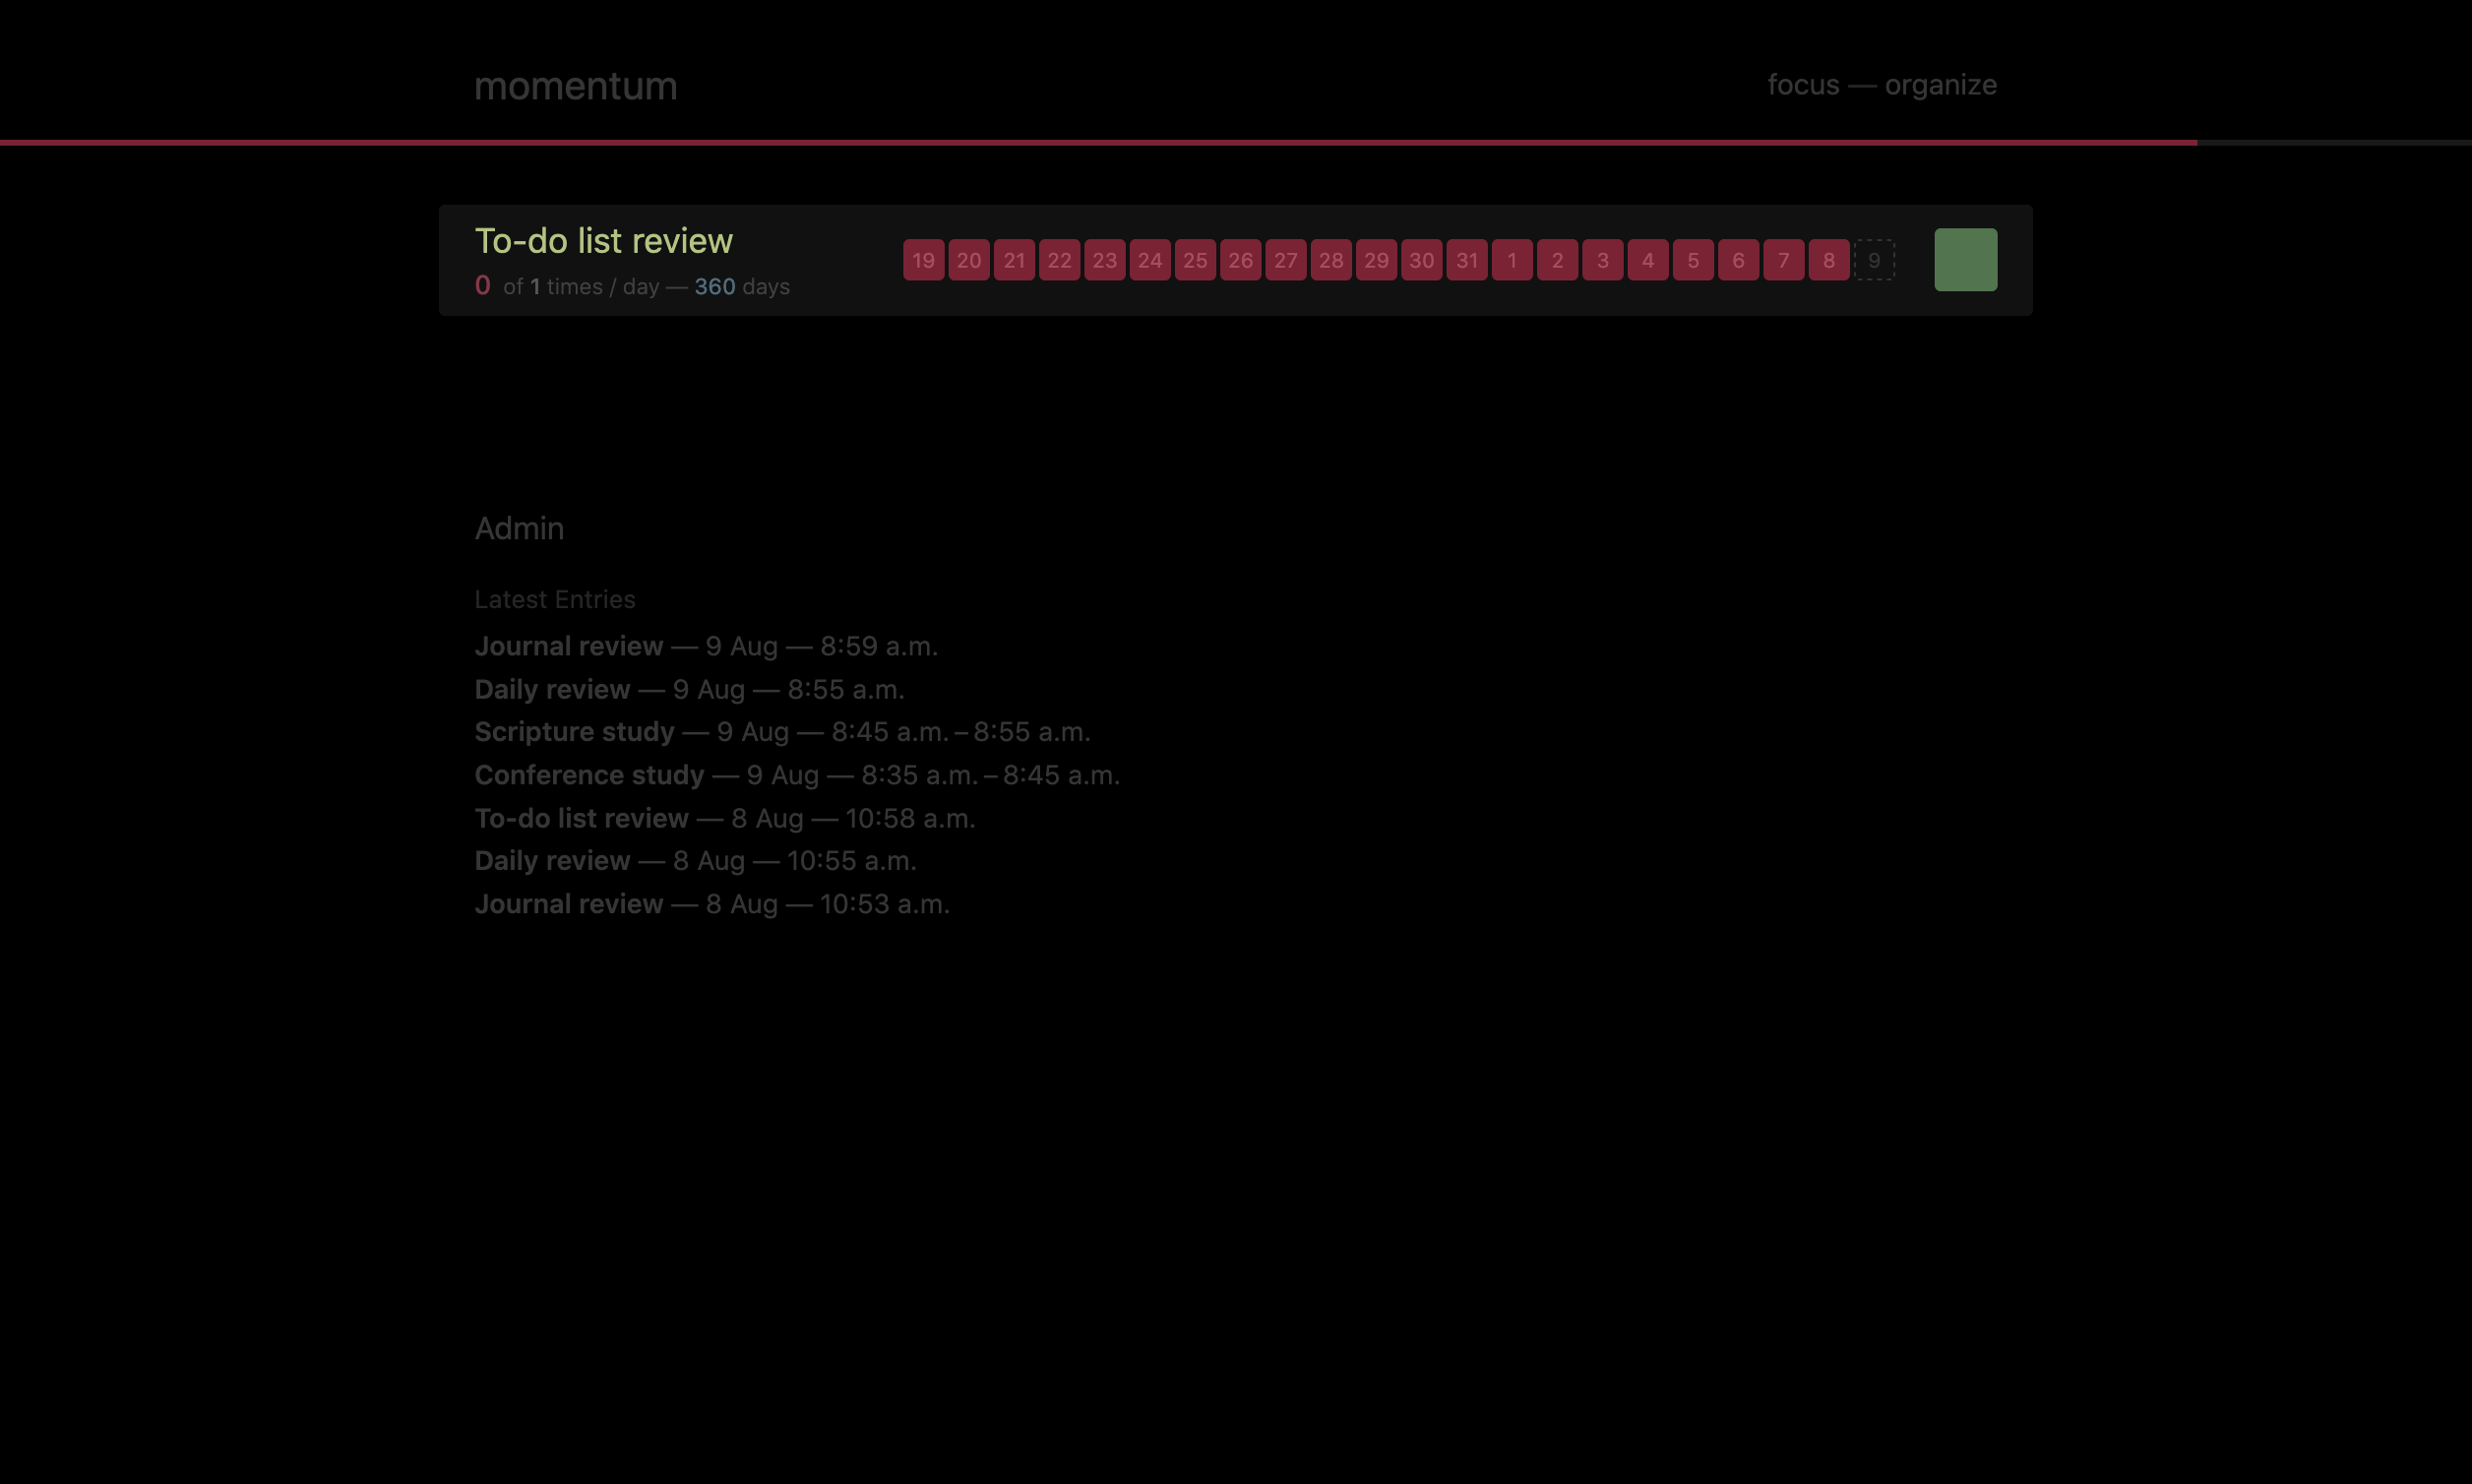
The future
The desktop view needs some love, particularly that stats page. (I added those genre tags to it a month or two ago and realize now that I never actually looked at the desktop version. Whoops.)
Also (this should be no surprise by now), I’m planning to switch it to FastAPI along with plain text files for storage, for the same reasons I gave in those other posts.
Another entry in the neverending series talking about my personal productivity tools.
Momentum is my daily goal app, for keeping a goal chain/streak going. It’s a Python app running Django. The name comes from the momentum that a long streak gives.
Overview
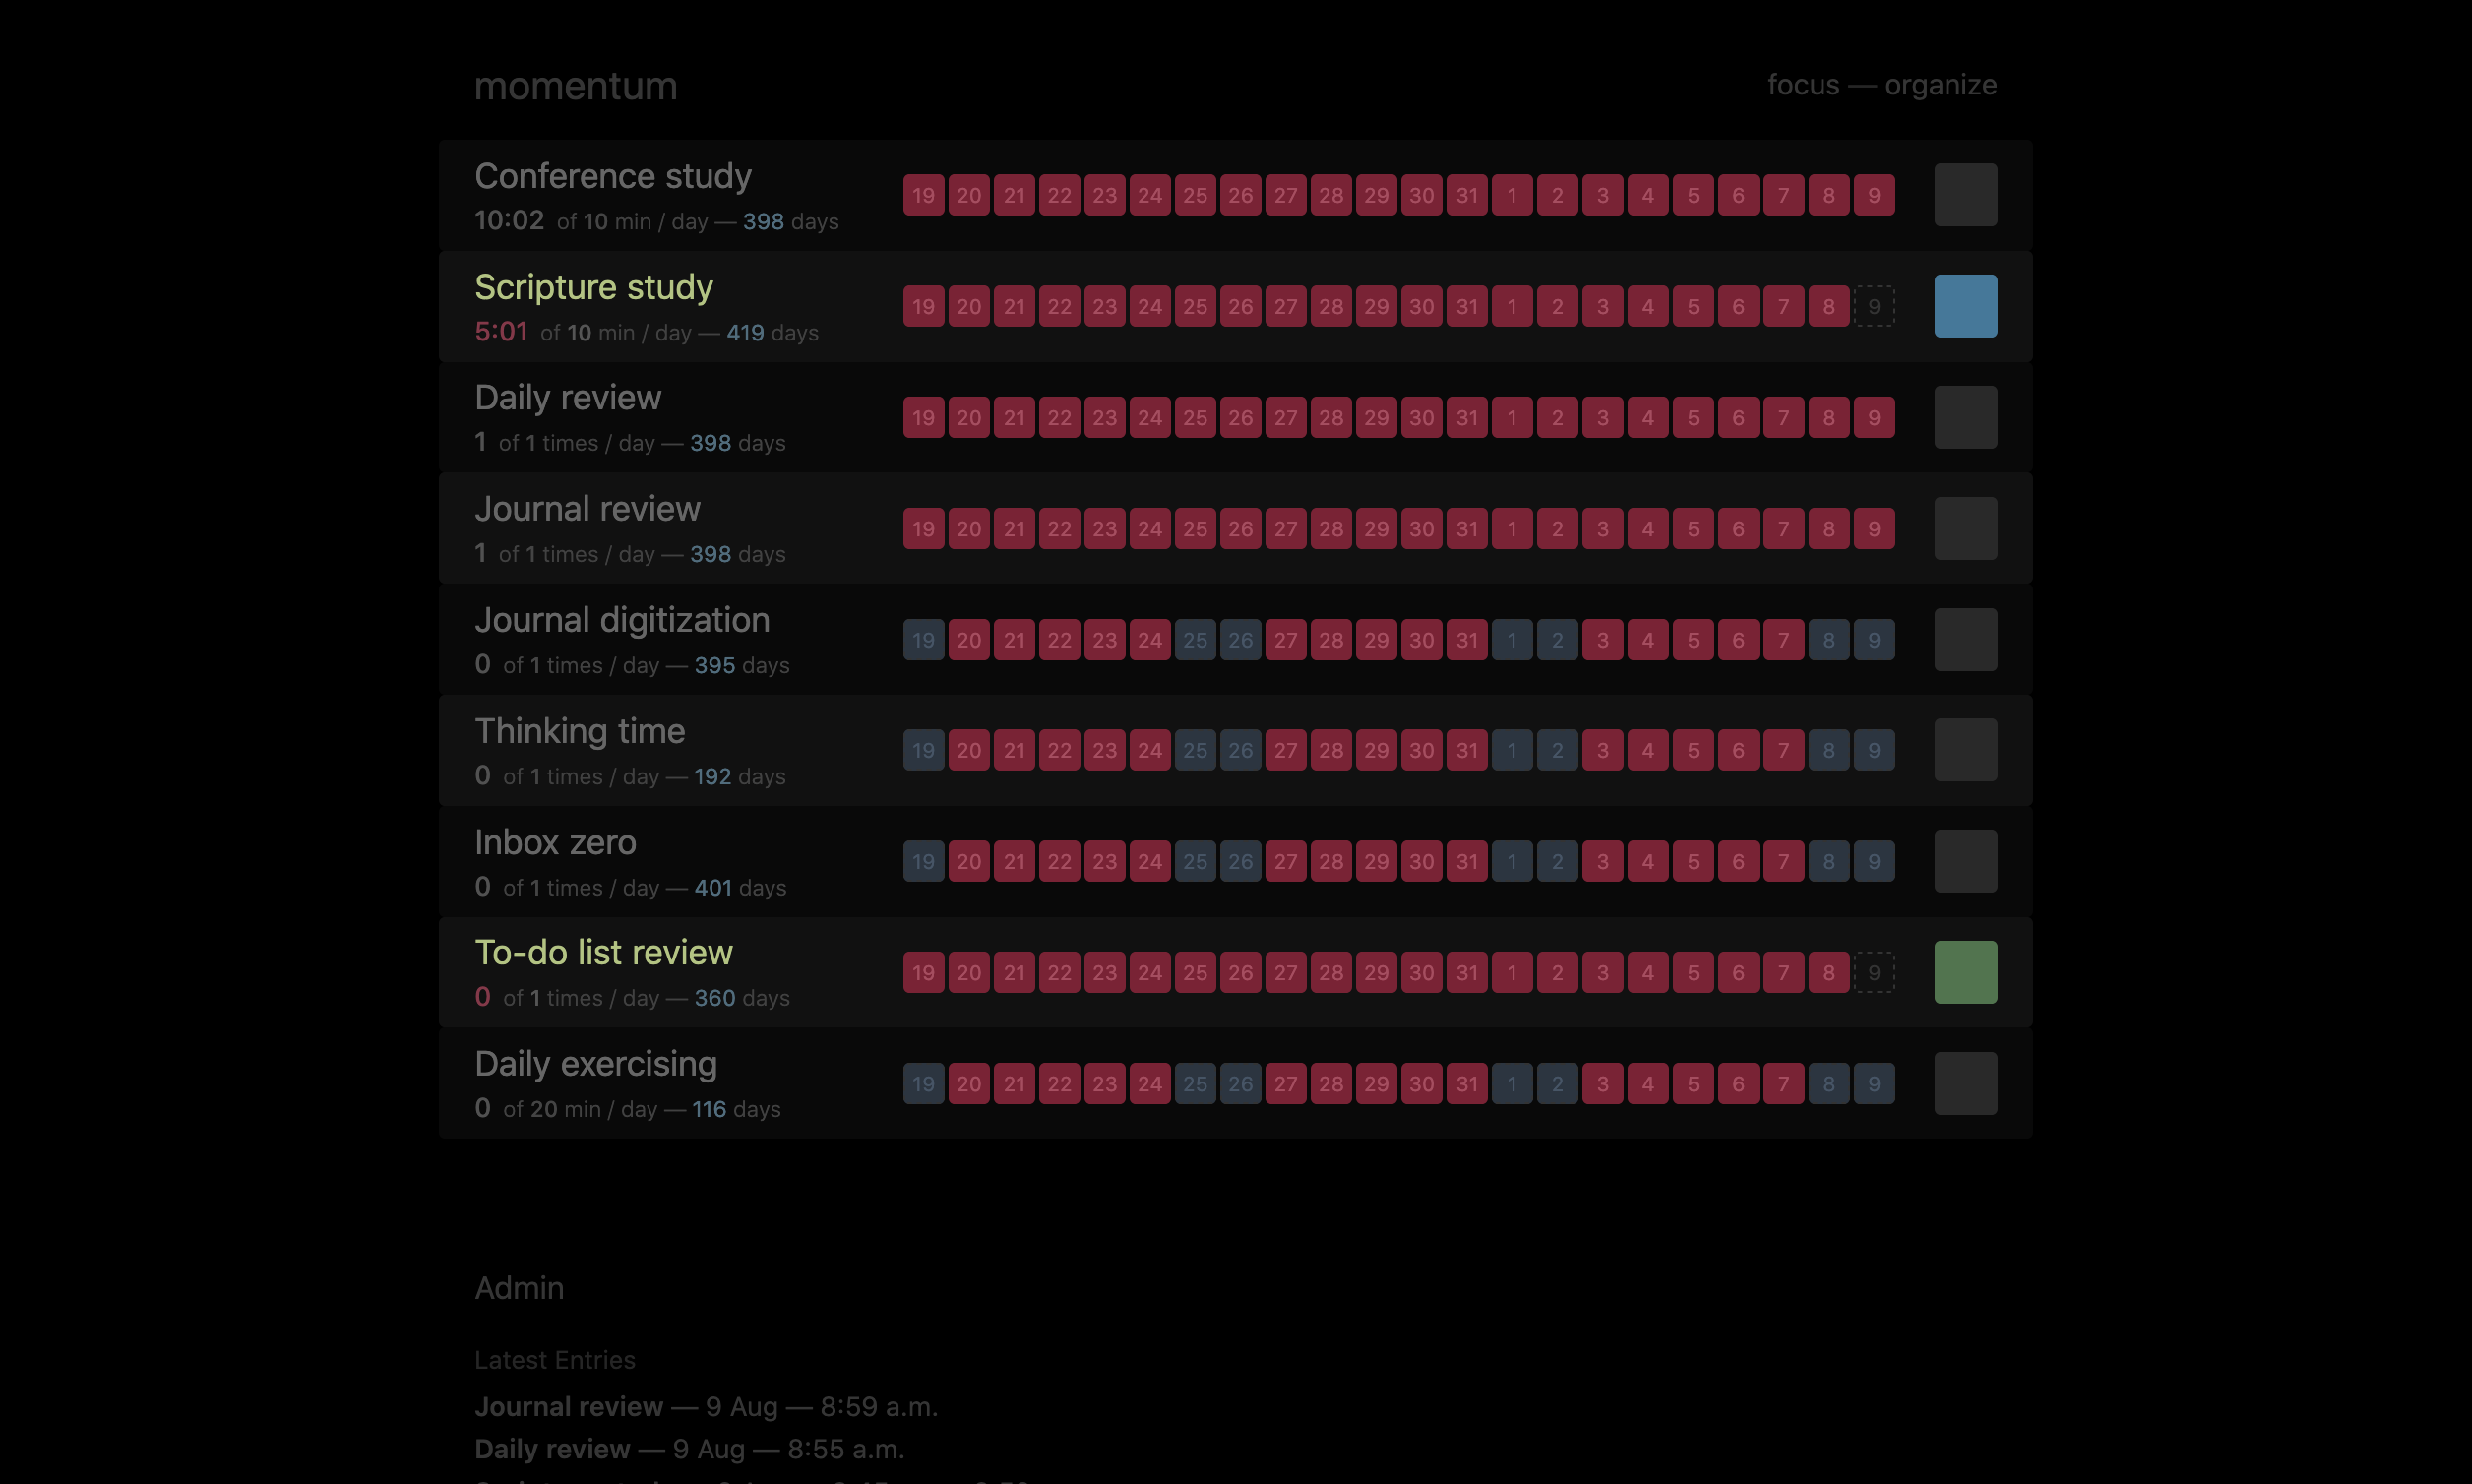
Goals can be either binary flags (whether I did it that day or not) or timed (in which case Momentum keeps track of the time spent). The default mode is focus mode, which shows only the top unfinished goal at a time and looks like this (with dummy data):
The thin red line along the top is a progress bar showing how close I am to finishing my Momentum goals for the day. The red boxes show the last few weeks of the streak, the green box at the right is the button for saying I’ve completed that goal for the day, and the blue text under the goal name shows how long the total streak is.
When focus mode is off, it looks like this:
You can see a partially completed timed goal along with a binary goal. Momentum also supports ignoring goals for Saturdays and/or Sundays (the gray boxes among the red), which I use for things I don’t usually do on the weekends.
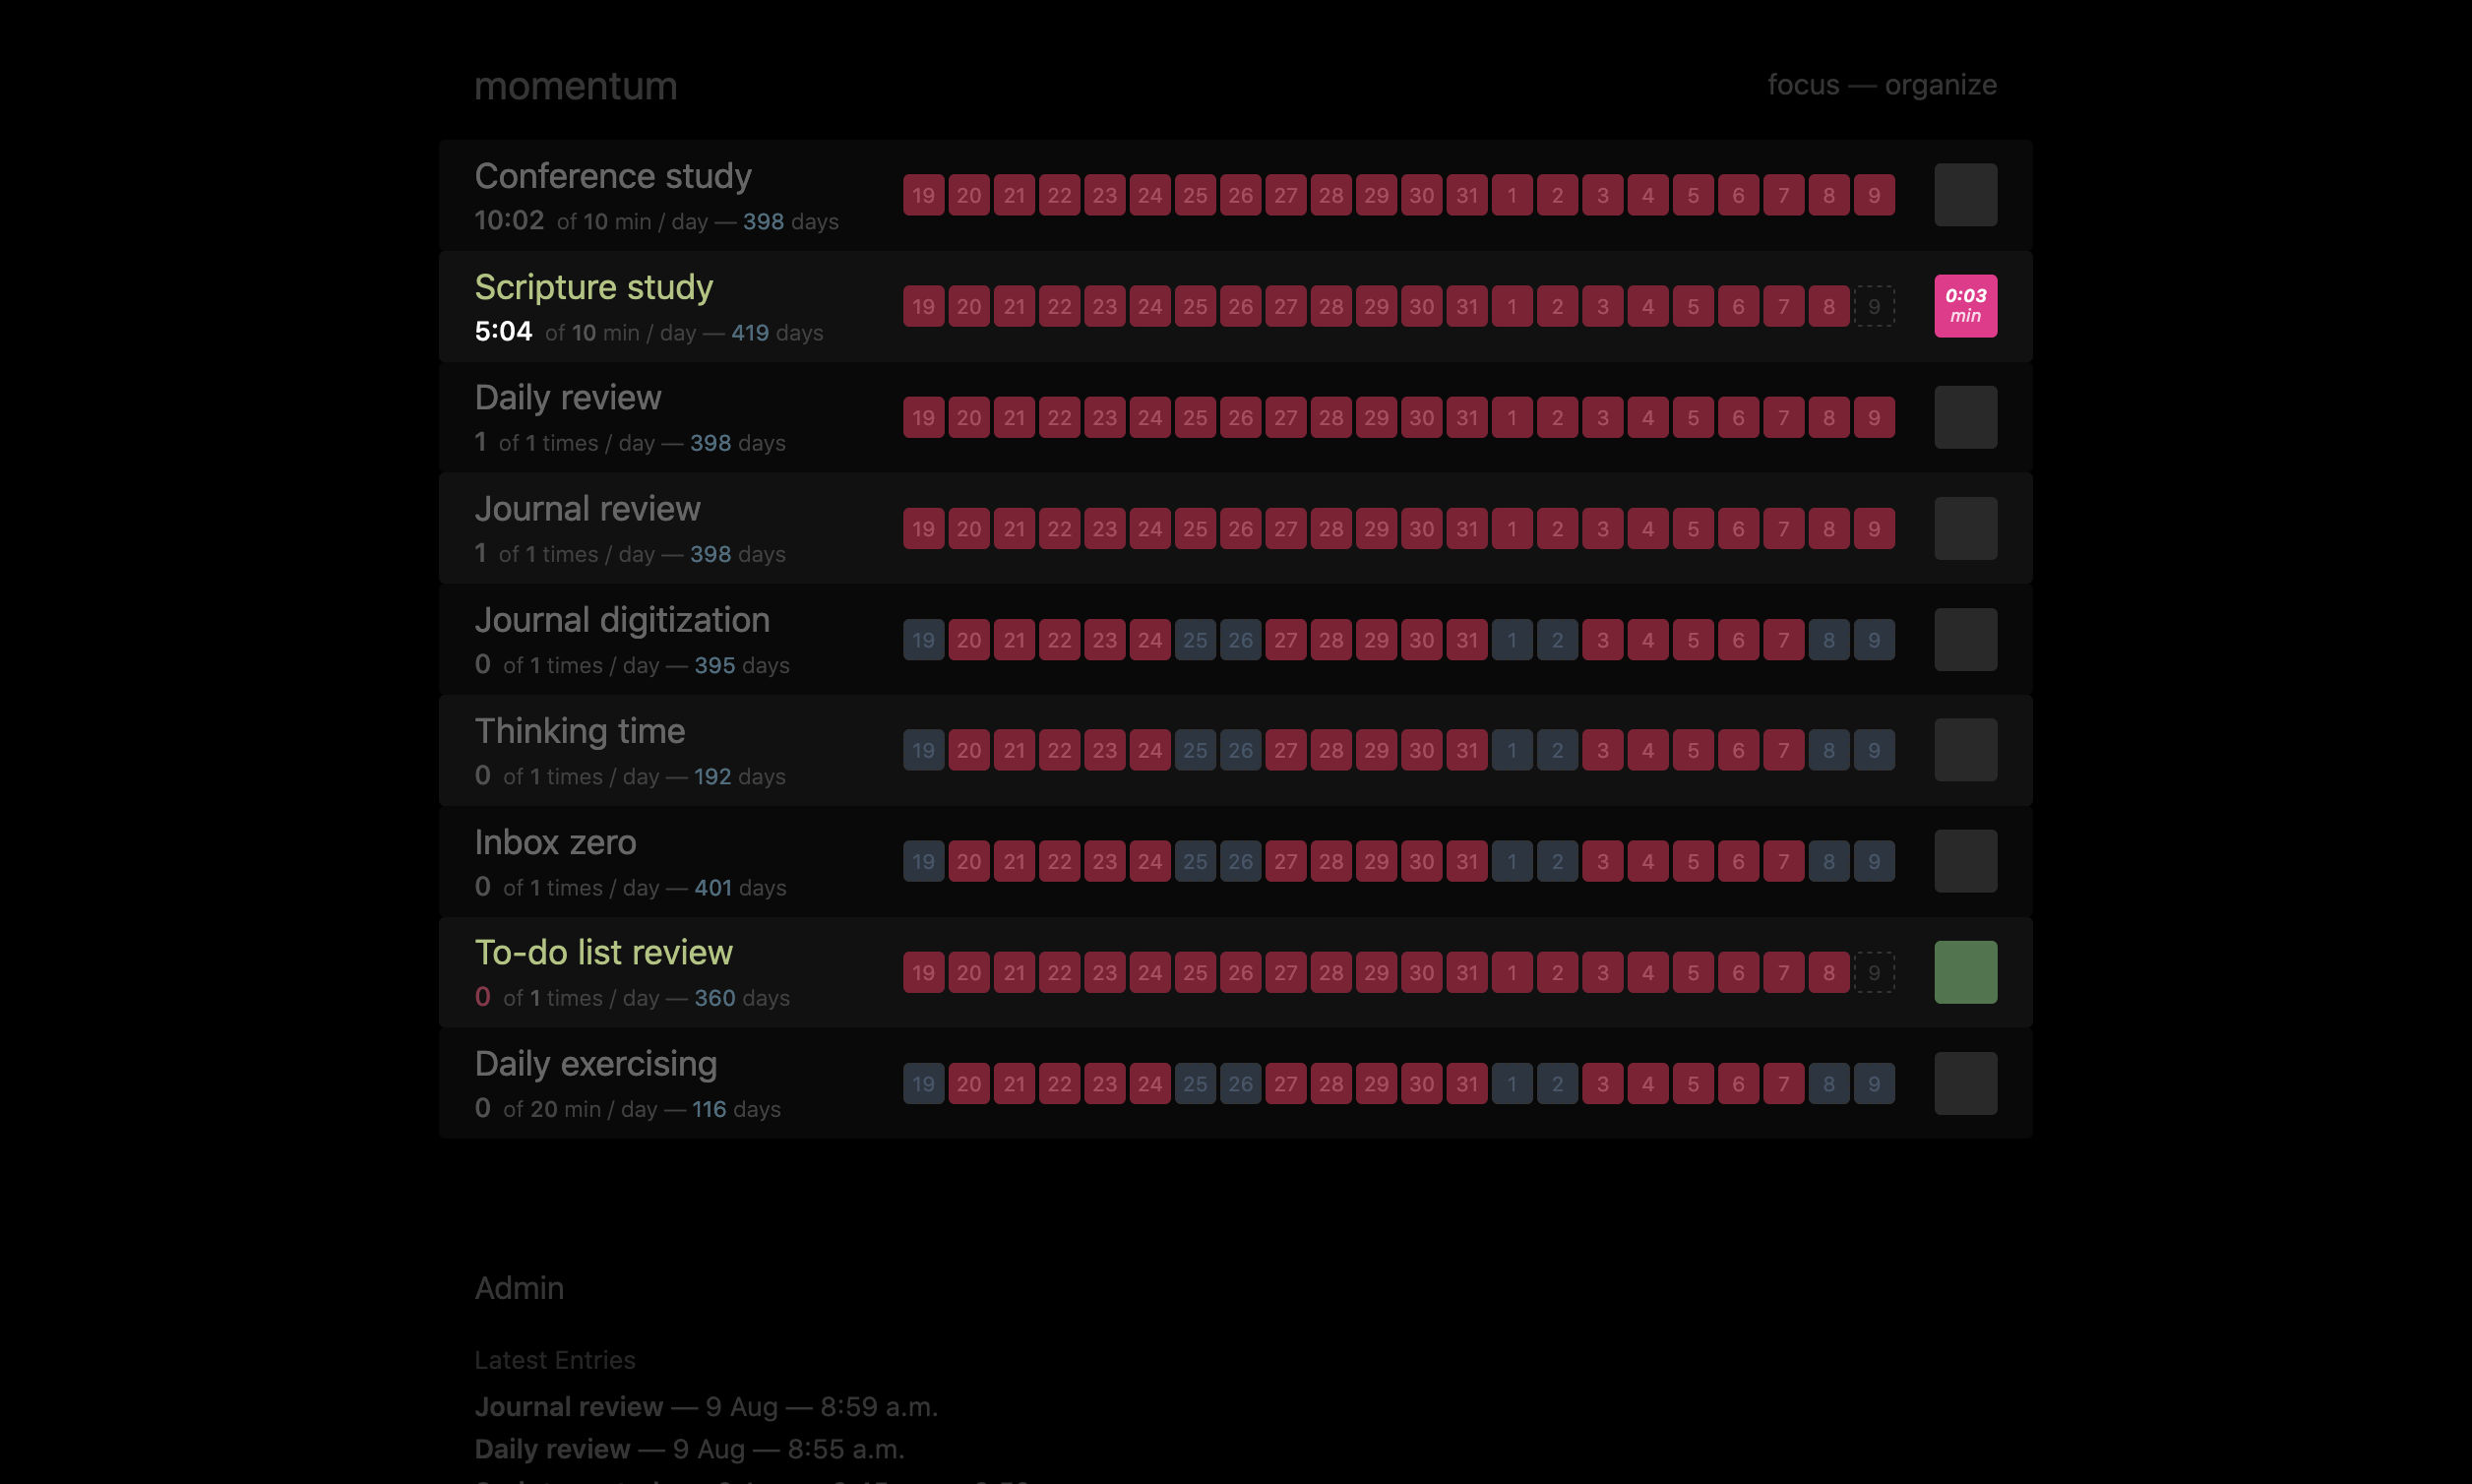
When the timer on a goal is running, the favicon changes and the page looks like this, with the pink box at right showing the elapsed time for the current session:
(The idea with the timer is that it may take multiple sessions spread throughout the day to meet the daily goal, by the way — if I wanted to make sure I spend an hour writing each day but don’t usually have time to do it all in one block, for example.)
How I use Momentum
On my laptop, I have Momentum open in Firefox as a pinned tab. On my phone, I have it saved to my homescreen as a PWA.
I use Momentum every day for my morning routine, primarily on my phone. The goals I put into it (as opposed to just adding things to my to-do list in Liszt) are things I want to do each day and, to some degree, are things I might not do if I didn’t have a streak pushing me forward (thus “Momentum”).
The future
I’m happy with the app as it is, but I’ve been thinking about merging it into Liszt, since goals like these are fundamentally to-do items. (Every morning Liszt already automatically adds all the items in my ::streak list to my ::today list, so that I can work off my to-do list without necessarily having to go back to Momentum as much.)
Giving Liszt items the ability to be timed is already in place with belt mode, so I’d just need to add the ability to keep track of both partially finished goals and total streaks. Seems worthwhile.
Another entry in the eternally long series talking about my personal productivity tools.
Quill is a quick entry app for macOS and is effectively a desktop version of Gate. It’s an Electron app for now. The name comes from quills being used to write.
Overview
Not much to show here, actually. It looks like this (and the minimalism is very much intended):
There’s a textbox for writing and a word counter at top.
Once a payload is written, all the subsequent functionality is controlled via keyboard shortcuts: an app-wide prefix (ctrl+l — that’s an L) followed by the destination. v goes to Vinci, l goes to Liszt, j goes to my journal in Vinci, and b goes to my blog in Slash. (On my laptop, I prefer this to the buttons I used in Gate.)
The payload and action are then sent to an API in Gate, which does the actual sending to the destination systems.
How I use Quill
I leave it open all the time and use a global keyboard shortcut (configured in Hammerspoon) to bring it to the front.
Beyond the integration with my other systems, I often use Quill as a temporary scratchpad for drafting documents — emails, Slack chats, etc. — usually because the type size is larger. I also use it as a scratchpad for copy-pasting rich text into plain text.
The future
I’d like to move off Electron at some point, probably to a native Swift app.
Gate is a small quick entry app for my phone. It’s a Go web app, and the name comes from it being a gateway to my other apps. I used to use Drafts, but when it switched to a subscription model I decided to do my own thing (which worked out well for me, since I was able to make other customizations I’d long been wanting to make).
Overview
The main screen looks like this:
Just a textbox and some basic controls at the bottom. When I tap the Submit button, it opens up a dialog with options for where to send the contents of the textbox (the payload):
Red buttons go to Liszt, blue to Vinci, green to Slash. And this is why I have the text-based payloads in all those apps.
How I use Gate
I have it saved as a PWA to the homescreen on my phone, nestled safely in my dock. I use it all the time. (I suppose I could use it from my laptop web browser as well, but I have Quill for that use case, so I never do.)
The future
I’m happy with the app itself. There are, however, some recent bugs with text controls in PWAs in iOS Safari where the keyboard either won’t come up or can’t be dismissed, but that’s out of my control. Hoping those get fixed soon (they didn’t crop up until sometime in the last year or so, I think).
Brief backstory: when I’m doing my minimalist religious art, I usually sketch an idea out first by hand or in Paper on my phone, then mock them up in Illustrator to iterate on the concept. Once it’s satisfactory, I move to execution, either painting the piece in Procreate or using some of the brushes in Illustrator to get a more organic look. And finally I texture the image in Photoshop.
A couple months ago I got interested in exploring alternatives to Illustrator and Photoshop for both execution and texturing processes. And me being me, I wanted to try doing it in code, just to see what it was like. (Some things are easier in code, though I don’t know how often that would actually be the case with these.)
Note: this is still very much a WIP, and who knows if I’ll end up using any of it or not. But here’s the current state of things.
SVG
After reading somewhere that SVG has turbulence and displacement filters, I realized I could potentially use those for the execution part of the process, to distress the edges enough to make things more interesting. (And hopefully to be less repetitious than the Illustrator brushes I use.)
I put together an initial test using a few different settings, and it turned out a bit better than I expected. A sample of the code:
The background rectangle, the red figure, and the white figure all have different turbulence and displacement values. The red figure uses two sets of turbulence and displacement filters, which worked out fairly well, I think.
I used Inkscape render it out to a high-res PNG, since Illustrator wasn’t able to handle the filters. Eventually, if I keep going down this path, I’d hopefully be able to find a command-line tool that can do the rendering. (Maybe Inkscape has a headless option.)
Overall, this path seems promising. I don’t know that I’d use it all the time, but for certain things it may be handy. I still need to look into sane ways to round corners, and it seems that the other filters (dilation/erosion, convolution, etc.) may be helpful, too.
Grain
I’ve begun writing a Python script called Grain for texturing the final art image. The goal here is to see if I can streamline the process at all, and to see if this idea even works. Grain takes as input a text-based input file that looks like this:
Each block is a layer. Grain starts with the bottom layer (the executed base image) and goes up from there, adding each layer on top with the specified blending mode and opacity.
The :pattern roughdots command would generate procedural dots (not implemented yet), and the textures# bit in the :image command calls is a shortcut to my folder with texture photos.
So far, the results are disappointing. While the layering does currently work, it isn’t yet producing anything remotely publishable. I think there might be some discrepancies between blending modes in pyvips and in Photoshop. Hard to tell.
And, less importantly, it’s a little slow — partially from using high-res images, partially from Python. If the idea ends up working, I’ll most likely port this to Rust or Go, and probably also have scale things down for the exploration phase of texturing (with a final high-res export at the end).
I’ll keep tinkering with it from time to time and we’ll see how it goes.
Slash is the engine that runs this blog. It’s just a Python app running Django, but calling it an engine is too satisfying for me to stop anytime soon. The name comes from the ubiquitous forward slash in URLs.
Overview
Slash has an internal frontend with some post management pages (see below) along with a small API which is used by Blackbullet (my current website engine, separate from the blog) to pull posts into my site template. The API also publishes the RSS and JSON feeds, which Blackbullet passes right through.
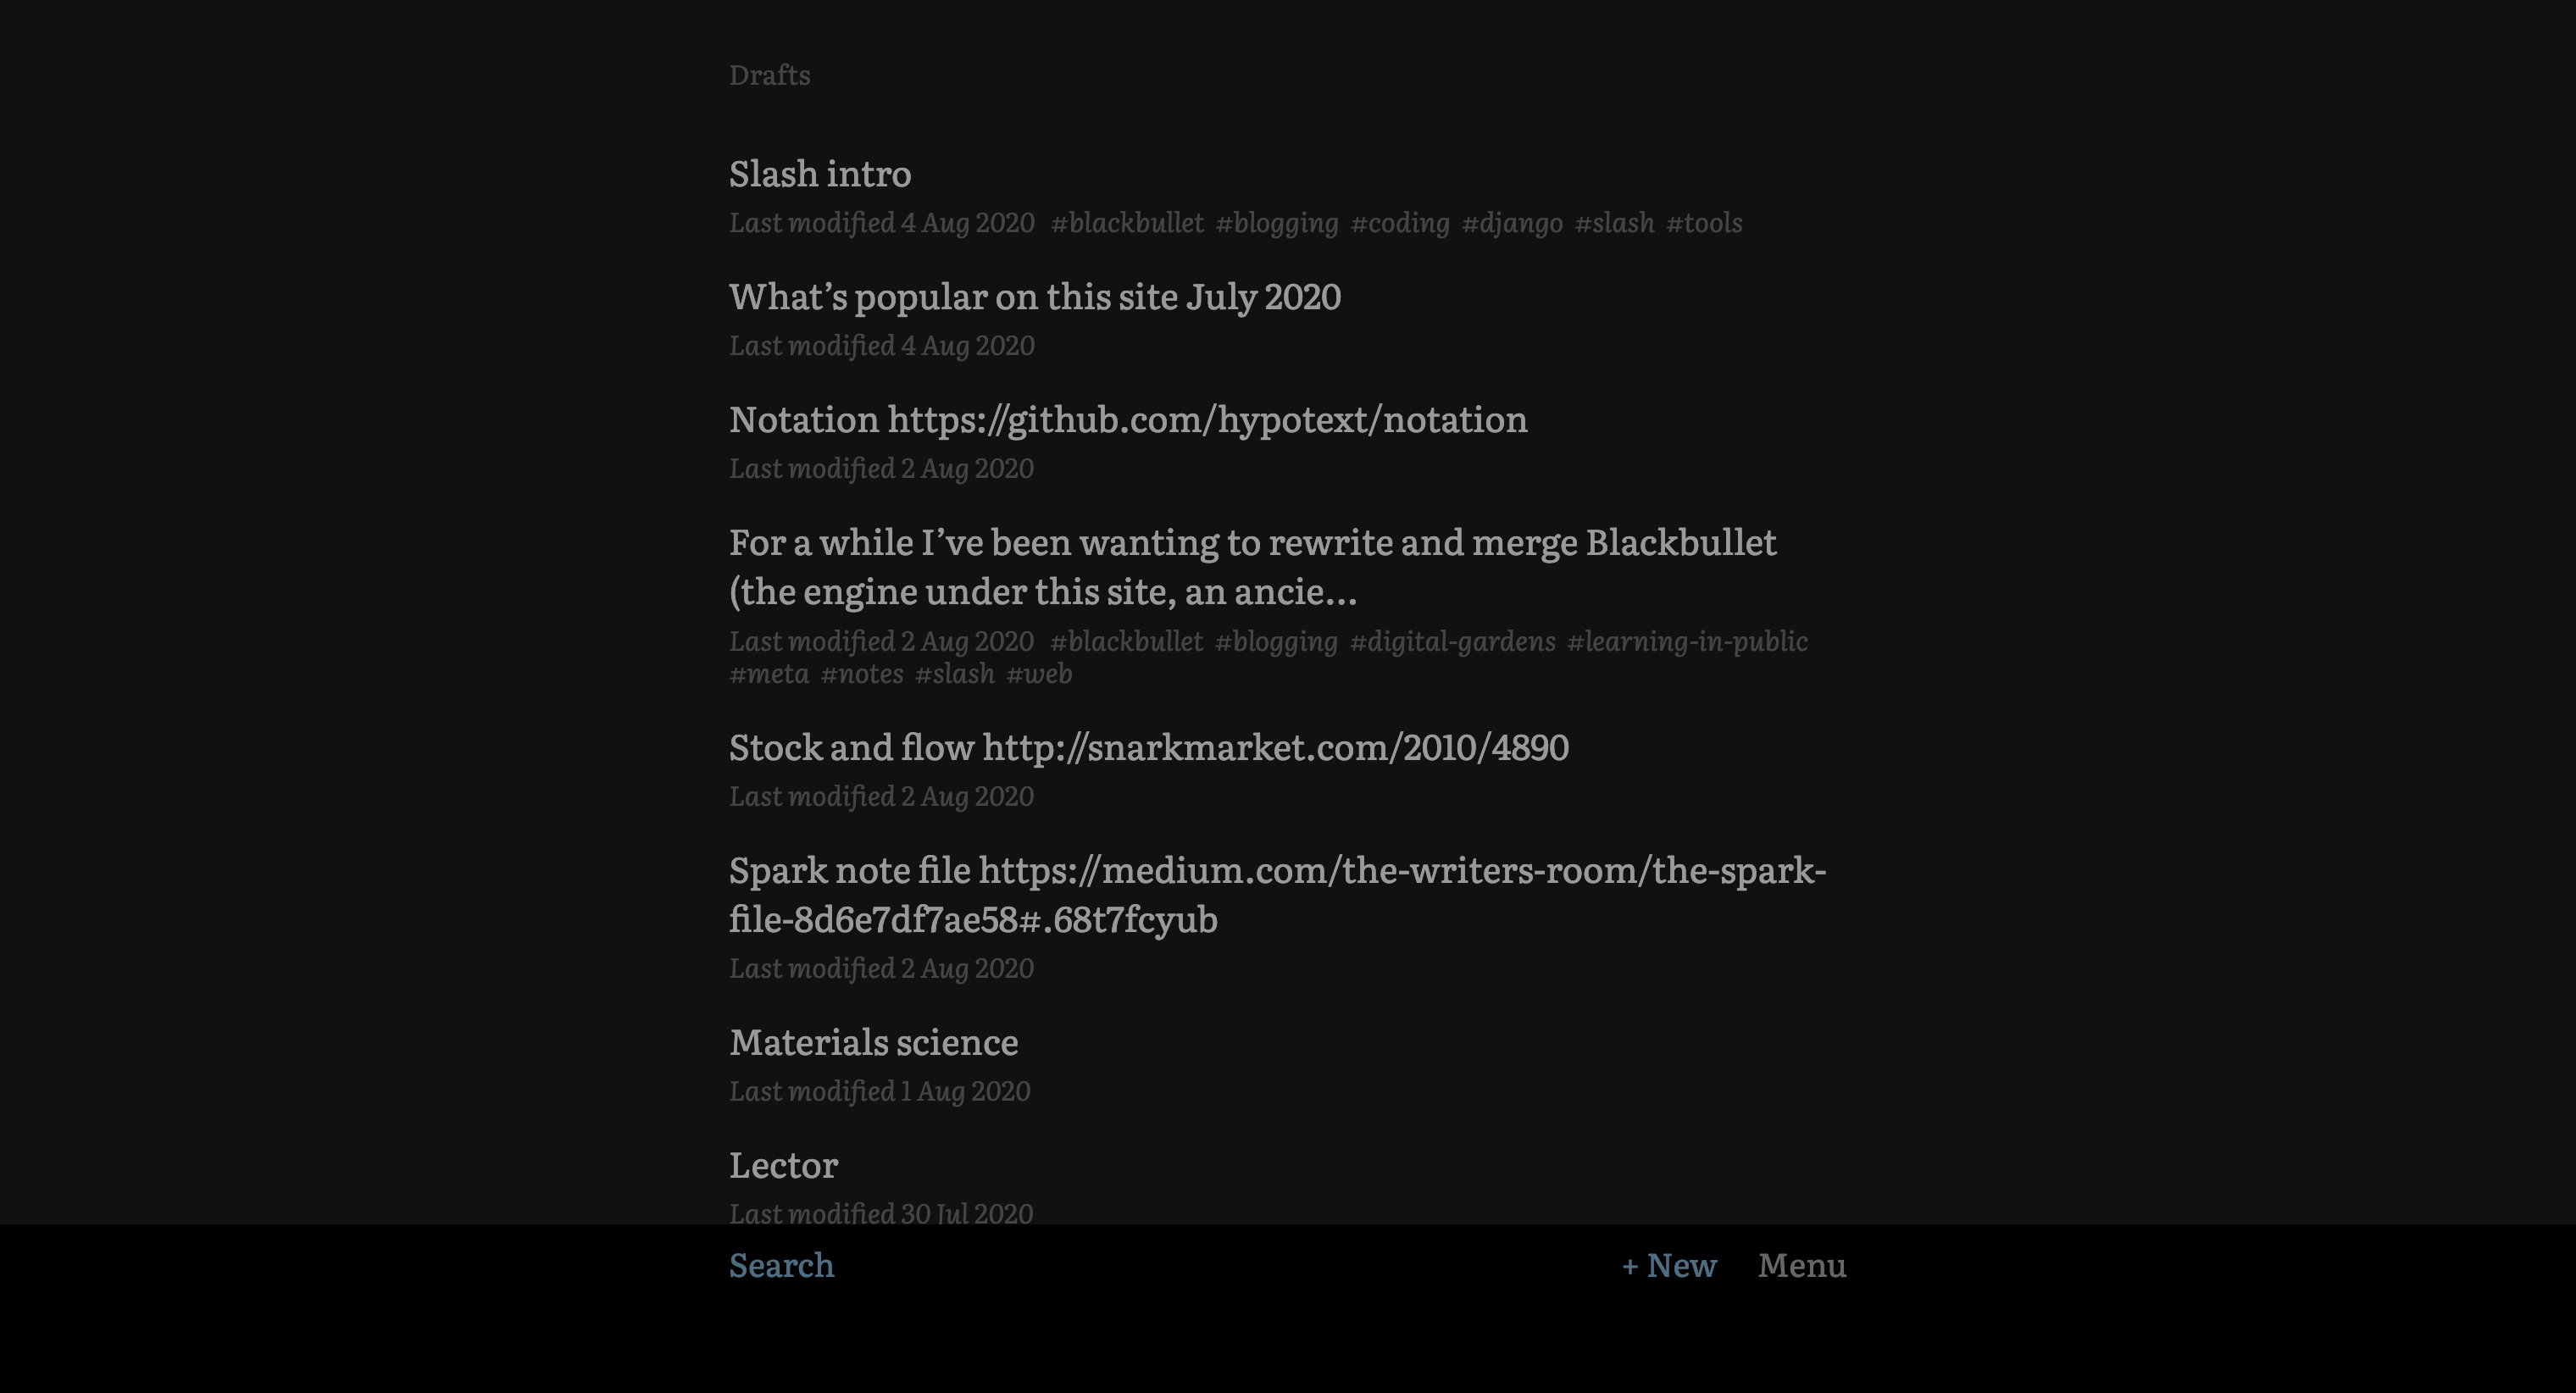
The dashboard lists current drafts and, lower on the page where you can’t see it in this screenshot, recently published posts:
Disclaimer: there’s no guarantee that these particular post drafts will ever see the light of day. I often put ideas in and then decide later that they’re not worth blogging about.
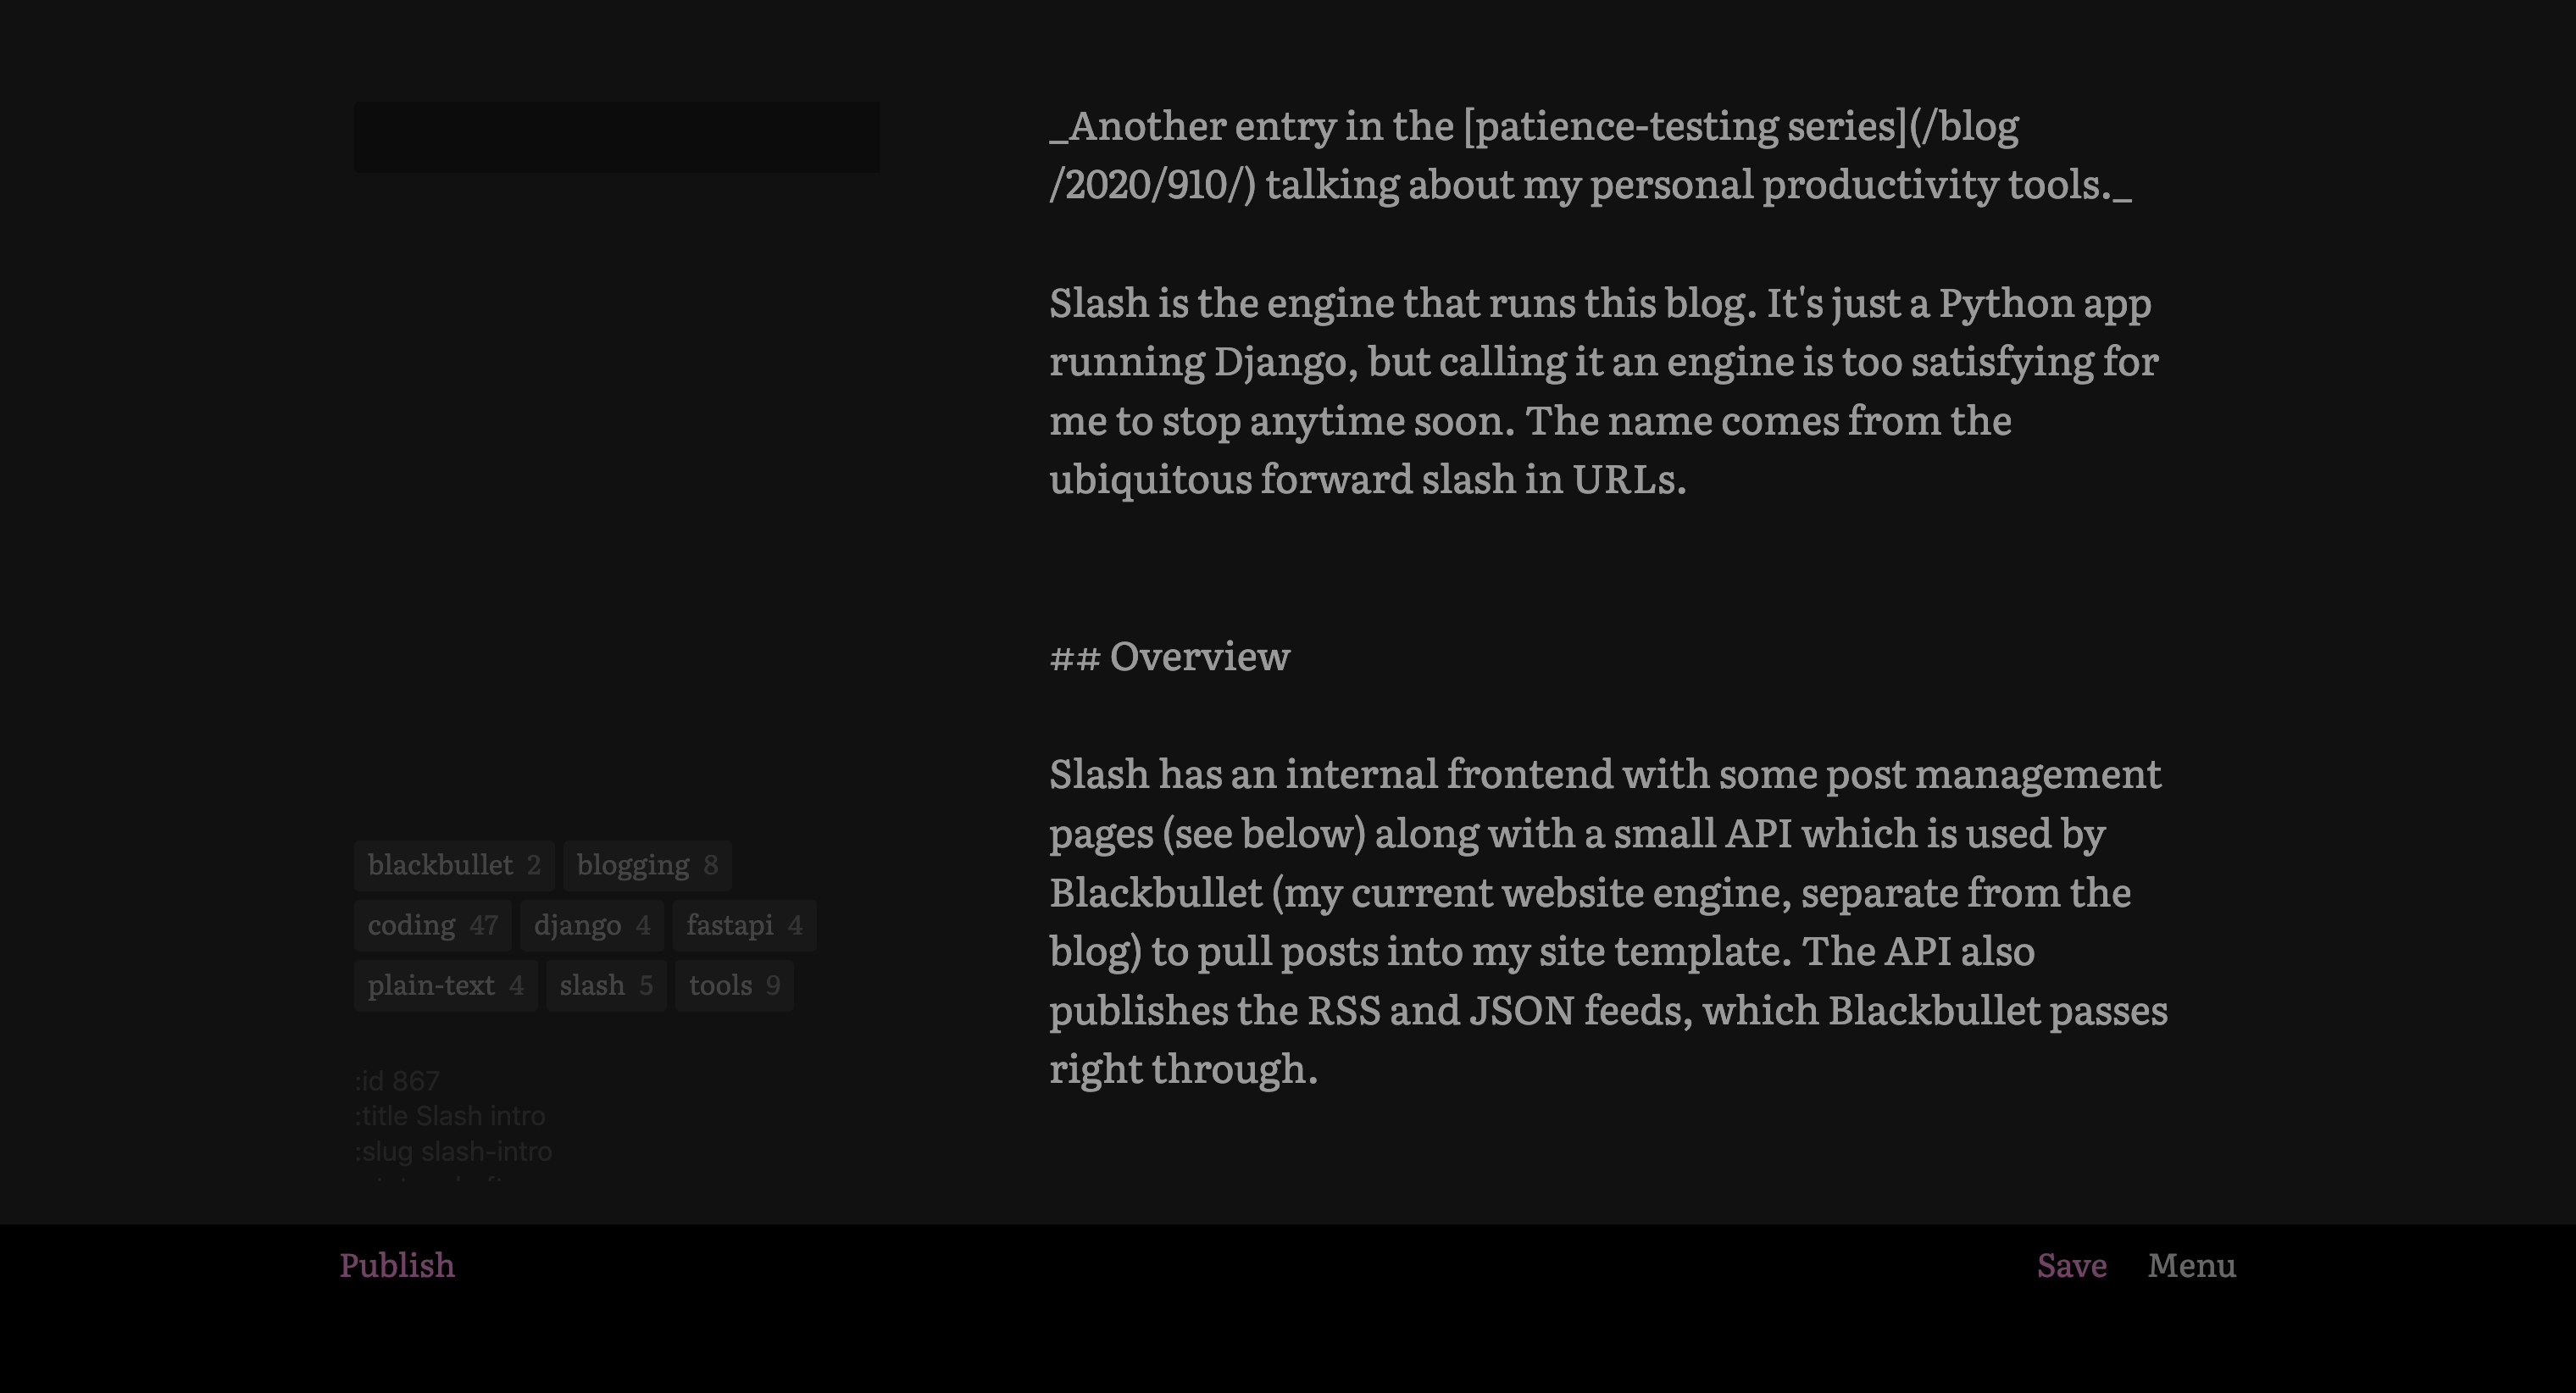
Here’s the post edit page, which is very much a work in progress (last week I added the visual tag controls, since adding tags via the metadata textbox made it impossible to tell whether I’d used a tag before or not):
It’s spartan but works for me.
Payload syntax
Other than the notebook specifier, the syntax is pretty much the same as Vinci’s. Posts are written in Markdown. Metadata is specified with the initial-colon syntax.
One thing I realize I forgot to mention in the Vinci post is that in both apps I have a shortcut syntax for including images that looks like this:
I have a page for uploading images to a date-named folder — year and month — and this syntax relies on the image being in the matching folder for the post. A small bit of convention to make things simpler.
How I use Slash
On my laptop, I open Slash when needed. On my phone, I have it saved to my homescreen as a PWA.
Other than that, I use it the way you’d expect — I write blog posts (usually directly in Slash, but occasionally in Gate or Quill), I edit them, I publish them. Months later I finally notice the typos. It’s not too exciting.
The future
As of now, the plan is to replace both Blackbullet and Slash with a new, simpler, consolidated Slash, using plain text for the backend and probably moving to FastAPI. Since I’m in the middle of planning the rewrite right now (and since I’m now working in public), you’ll see posts about it soon.